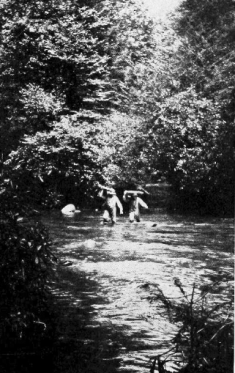
Carrying in the Boards
Clapboards and Puncheons
By: Horace Kephart
Taken Fom: The Outing Magazine Volume LVII
October, 1910 - March, 1911
Log cabin is cozier cabin than any tent when Jack Frost is abroad, when one has been out all day in the snow; it is good to come back to a big stone fireplace full of crackling logs. It is good to have a dry floor, a reliable roof, a wall full of pegs and shelves; to have benches or stools, and a big table, chests that are vermin-proof and a cupboard full of handy things that that no nomad can tote around. Tents are for summer outings and shifting camps; a cabin is a home, staunch against the elements, secure against marauding beasts, habitable at any season.
This is what many a hunter will be thinking before the big game season is over, and many a one will be planning some sort of hut for seasons to come.
Since good hunting is seldom found in the neighborhood of a sawmill, a lumber yard, or a wagon road, the crux of the cabin scheme is how to get roofing material. Bark is flimsy and will scarce outlast the season. Tarred paper - what is more hideously unfit than a paper covering over honest log walls? Such a roof fairly shrieks against its surroundings, and they groan in answer. Anyway, paper requires sawed boards underneath, and the only way to get those boards is to whip them out with a pit, or muley saw. A back-breaking task, indeed !
The thing to do is to rive clapboards from trees that grow on the spot. A clapboard is simply a thin board, from two to four feet long, split or worked with a froe from straight-grained timber. It is a little thicker along one edge than the other, being split from bolts. A clapboard roof is dependable. It harmonizes better than any other with the general woodsy effect. When properly laid, it is storm- proof and will not cup. It will last a generation.
First Cut in the Bolt
Riving clapboards or shingles from the green tree is almost a lost art. Not one carpenter in fifty, nowadays, can show you how. I have never seen the process adequately described in print.
The tools required are few: an ax or two, a pair of steel wedges, a crosscut saw, and a froe. It is convenient to have a small sledge-hammer for driving the wedges, but you can make a maul on the spot that will do well enough. Pick out a sapling of some tough, hard wood, such as oak or dogwood. Saw it off close to the ground, just above the stools of the roots, where it will stand a lot of battering before it will split. Use this for the maul head and shave up from it for a handle, making a big club. In the same way, make a mallet for your froe, out of a small limb.
Wedges are best of Oregon pattern, wide edged and thin. The saw should have a five and one-half or six foot blade, preferably of lance-tooth pattern.
The froe is a tool that is seldom seen, nowadays, outside of the backwoods. If you find none in town, you can get one from a mail-order house. Its shape is shown in one of the accompanying photographs. The blade should be straight (old ones that have yielded to the mallet and becomes way backed are hard to manage). It should be about fourteen inches long, rather thick, and stunt- edged, as it is for splitting, not cutting. Its weight will be about five pounds. A green stick will do for the handle.
Success in riving depends chiefly upon how you select your tree. Wood for this purpose must be sound, straight-grained and springy. If brash or doty, it will not do at all. Nor will "any old wood" do that splits easily; it must split straight and make thin boards.
The species of tree will depend, of course, on what growths one has to choose from. Here, in the southern Appalachians, our first choice is mountain oak, when we can get one that splits well. Its wood resembles that of the live oak in texture and hardness. Otherwise we take white, black, red, or water oak. Among softwoods, cedar is best. White and yel- low pines are much used, occasionally yellow poplar.
Riving Clapboards
A young, quick- growing chestnut makes good eighteen- inch shingles, but not the longer clapboards, as chestnut is prone to "run out" when long splits are made. Mature chestnut trees are generally full of worm-holes. Sometimes a hemlock is found that will make clapboards, but it must be split bastard (the way the rings run). Balsam is of similar nature.
When a suitable species is found, the next thing is to pick out a good "board tree." This takes an experienced eye. Leave it to a native woods- man, if you can. The way he does it is not easy to describe. He looks, first, for a straight trunk, free from knots, limbs and dote. It should be not less than two feet thick. Then he scans the bark. If the ridges and furrows run straight, in a general way, parallel with the trunk, it is an indication of straight grain. An oak with a large fork is likely to split well.
But there is more than this in picking a board tree; the wood should be not only separable but springy. The woodsman will tell you that he "senses" this; and he does, to the extent that his choice is guided by no rule nor process of reasoning. Twice out of three times he is right when he says "That tree 'll do ;" nine times out of ten he is right when he says "That tree 's no good."
Experience has taught me that a tree with a certain "look" is likely timber, but I can't, for the life of me, describe that look. You may have to split a big block out of a tree, test its cleavage, and try several other trees before you find a good one. This is bad practice, but not so bad as felling, sawing off a cut, and then leaving the tree to waste utterly.
When the right tree is found, throw it in the best place for working up, and saw off a cut (eighteen inch for shingles, two and one half to three feet for clapboards). If this is your first trick with the crosscut, observe that your sole duty is to pull and help guide the saw straight. If you push as well as pull, the other fellow will "ride the saw" while you do the work. When the saw begins to bind, drive a wedge lightly into the top of the kerf, not deep enough to crack the log.
Having sawed off a cut, squarely at both ends, turn it up on end. Then, with a single-bitt axe (or wedge) and mallet, mark an indentation straight across the center of the block.
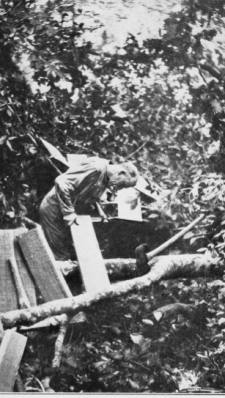
A Homemade Shaving Horse
Do not tap hard until you come to the end of the line; then strike vigorously, and the block will fall in halves. If you struck hard from the first, the split might run off to one side. In the same way, split the halves into quarters, and these into bolts or billets of convenient size for riving. A bolt is usually of such thickness that it will make eight boards or shingles - say five inches across the outside.
Now split out the heart-wood of each bolt, by laying the axe across and tapping it. Heartwood is useless, for it won't split well. In some trees the heart is so tough that it. is advisable, instead of halving and quartering your cut, to just split in toward the cut, all around, to bolt size, and then knock out the bolts by driving the axe in at right angles to the cuts, leaving the heart as one solid core. Skin off the bark, and your bolts are ready to rive.
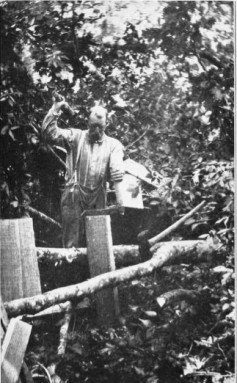
The next thing is to make a brake. This may be simply the fork of a limb, as in our photograph. Another way is to lay two blocks against the prostrate trunk of your board tree, at right angles to it, like fire dogs, and a yard or so apart; on them lay a small log, parallel with the trunk, and drive stakes outside this "roller" to keep it from rolling more than six or eight inches away from the trunk. The office of the brake is to clamp one end of the bolt while you are riving with the froe.
Now take up your froe. Stand one of the bolts on end, lay the froe's edge accurately along the center of one end, and split the bolt in twain by tapping with the mallet and springing your cleft apart with the froe. Take one of these halves and rive it similarly into two equal parts.
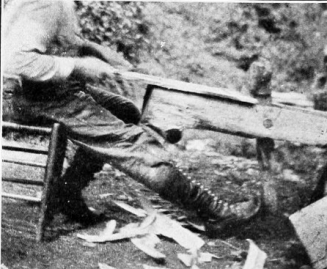
At this stage (more surely at the next one) you must learn a new trick - the difference between riving and mere splitting, and how to govern the rift. The wood has a tendency to "run out" more toward one side than the other. If you went on just forcing the froe down, the result would be a botch. To prevent this, turn the block so that the thicker side is down, lay its lower end in the brake, open the cleft until you can insert your flat left hand (the froe will prevent pinching), and then bear down hard on the bottom (thicker) section while you work the froe gently up and down. This will make your split run back again into the thicker section. My photograph of a man riving shows how the brake comes in play.
Having quartered the bolt, now carefully rive each quarter into two clap- boards or shingles. You may have to turn the piece three or four times in order to get boards of uniform thickness.It is right here that judgment and skill are called for.
With good wood, already bolted, an experienced hand can turn out about one thousand clapboards, or four thousand shingles, in a day. Experts do better.
Clapboards, although slower to make than short shingles, save time and labor in the end, because of their extra span, and because they can be nailed directly to rib poles running lengthwise of the roof, whereas shingles require strips of board or flattened poles laid across rafters and close together. The rib pole construction makes a prettier gable end than the usual way of boxing up the gable with boards, because courses of logs are carried all the way up into the peak. Sawed boards break rustic effect.

However, if shingles be preferred, they, too, can readily be made from the green tree. These hand-made shingles, if finished by shaving smooth with a drawing knife, are superior to the mill product.
To make them, a large tree is chosen, and the cuts are double bolted. Since the sides of the outer bolts are almost parallel, the unshaved shingles will be of nearly even thickness on both edges. In riving shingles the bolt is turned end-for-end every time a shingle is struck off, and the shingles are allowed to run out a little so as to be thinner at one end than at the other. A rude but efficient shaving-horse is shown in the small photograph. My partner and I made it in an hour out of a chestnut log and a dogwood fork, with two sticks for legs. A stub of the fork was left for clamp-head. In use, the operator pushes against the lower end of the clamp with his foot. A bowstring might be run from the head of the clamp to a springy stick inserted in the log a few feet back of the clamp, to hold the latter back out of the way when not in use. The far end of the log nearly rests on the ground. For ordinary cabins, the clapboards or shingles do not require shaving.
Shingles are best made of soft wood (cedar is first choice). Then, if stacked and seasoned, they will not cup. If oak shingles are seasoned they will split in nailing; consequently they are used green. Moderate cupping does not necessarily mean a leaky roof, but it is unsightly. Clapboards, although al- ways laid green, cannot cup, because they are nailed at both ends. They should be laid thick edge to thick and thin to thin. A thin board will outlast a thick one and makes tighter joints.
Speaking of cupping - it is universally believed by backwoodsmen that green shingles will surely cup if laid at any other time than "the old of the moon." Twice out of three times they will cup anyway, but it is heresy to say so.
Puncheons, for flooring, are split out with wedges and hewn smooth on the upper side with broadaxe or adze. Since both of these tools are difficult and dangerous for inexperienced men to handle, an amateur may well content himself with the slower but more accurate jackplane.
Almost any tree that splits straight will do for puncheons. Those commonly used are poplar, oak, chestnut, ash, cedar, spruce, and pine.
A small tree is merely split through the center, and the halves laid with the round side down. One of medium size is first halved, and then each half is split parallel with the flat side, making four puncheons from each log. Very large trees are riven into long bolts in the same manner as clapboard bolts, thus making a considerable number of narrow puncheons from each log.
The logs are usually cut so that two lengths equal the length of the room - eight-foot puncheons for a sixteen-foot room, and so on.
They are laid by fitting the rough side to the sleepers. It is best to leave them loose until they have seasoned ; then true up their edges, spike them down, and you will have a tight floor of uncommon solidity and warmth.
It may be well to say that the pretty log cottages shown in most books on rustic architecture are far more expensive than average backwoods dwellings - needlessly so for hunters and fishermen. If one gets the right to use what trees are required, or if he owns the land, he can have a cabin built for fifty dollars that will serve him well for a lifetime. This includes wages for all the heavy labor.
The hut would be of only one room, about fourteen by fifteen feet inside ; but that is big enough for a party of four. The occupants can add finishing touches from time to time, according to taste, but the essential structure need cost no more than I have mentioned. Rough, of course; yet a staunch little home that will fairly twinkle welcome with each returning season of outdoor life.

– Check Out Our –
– Other Websites –


– Check Out Our –
– Featured Articles –