Drying And Dehydrating
Taken From: Save It For Winter
By : Frederick Frye Rockwell © 1918
As we have already seen, in considering the saving of food for winter by drying, the moisture content is lowered and the sugar content raised to a point where bacteria, yeast and mold find a condition or environment in which they cannot thrive sufficiently to cause the food to spoil. The first problem in the practice of food drying, therefore, is to determine what is the best method to get rid of the surplus moisture which is to be extracted from the food product to be saved. The first method coming to mind, probably, would be to put it in the oven and dry it to a crisp. Experiments have shown, however, that in the drying of food products to save them, two things must be guarded against : first, if they are made too dry, the cell-structure is altered and they cannot be brought back to their original condition when wanted for use. Second, if the water is extracted by heating them too suddenly, or at too high a temperature, the flavor of the food will be altered. What should be aimed at, then, is a method which will extract just sufficient of the water from the product to make it keep perfectly and to do this with as little change as possible in the product itself: that is, injuring the product as little as possible physically and keeping it at as low a temperature as possible to avoid scorching, charring, or even cooking it. These facts should always be kept in mind in preparing foods for keeping for winter by drying. Few persons have any conception of the amount of water which the average fruit or vegetable contains. If all of the water should be suddenly extracted from a potato or apple which you held in your hand, there would be nothing left but a small hard sphere about the size and weight of a large marble, or a “skeleton” potato or apple about as heavy as a puff-ball.
The drying of fruits and vegetables was formerly done quite extensively as a method of saving food for winter in the home; this disappeared to a large extent with the advent of canning, because the methods of drying then in use were available only for a limited number of things and did not give a uniform product. This, however, was due to the methods used and not to the practice of drying vegetables. In Europe, even before the war, vegetables were saved by drying on a much larger scale than in this country. Without doubt one of the secrets of Germany's being able to maintain herself against starvation, notwithstanding that she did not have access to the outside world in obtaining food for her millions of population, was the fact that the surplus of vegetables, and especially of the tremendous crops of potatoes, had been dried and stored for future use for years. Since the war, an important part of the food conservation program in every European country has been the drying of summer surpluses of fruits and vegetables for winter use. The importance of this method has been so fully realized by the various governments that they have taken it under their direct control, building enormous municipal drying plants and establishing community dryers where they would be of the most use, and even sending portable drying outfits from one farm to another to save all the available surpluses. Immense contracts have been given concerns in the United States and in Canada to supply dehydrated vegetables for the use of the civil population and of the armies in Europe. It is not merely as a war measure that the form of saving food for winter by drying will be of importance. Without doubt within the next few years the drying of many vegetables will assume almost as much importance ,both commercially and in the home, as canned goods now do. With some vegetables, and especially where there is plenty of room and suitable conditions for storing, it is not supposed that drying will take the place of canning and of winter storing; but there is hardly a home where it cannot be used to advantage for some things. Dried products require very much less expense for containers, such as glass jars, cans, etc., than canned products, and they require very much less room for their storage. The dry products can be kept in wax paper and other containers that could not be used for canned goods. They can be exposed to freezing without the danger of breakage and loss. Another point of great importance to the family which, as many do, spends the summer in the country is that the dry products can be put up during the summer or in vacation weeks and easily taken back to the city; whereas canned products involve great risks and expense in transportation, even if there is a place to store them after they are brought back to the city. While all these things make a difference to the woman living in the country, they are of still greater importance to the city housekeeper. With her, usually, storage room is at a great premium, and often kitchen space also is cramped. The effort necessary to put up any amount of canned products causes her to depend almost wholly upon the store for her winter vegetables, either fresh or canned. The city housewife, on the other hand, usually has the best of facilities for drying products by modern methods. In most homes electricity is available and without that the gas range, with its easy and accurate control of heat, makes drying a comparatively simple matter. Even though only small quantities be dried at a time, the total at the end of the season will be a very considerable amount of food stored for winter use.
Various Methods Of Drying And Explanation Of Terms Used
While the drying of vegetables is a general term which applies to this method of keeping food products, regardless of the details of how the work is done, the newer terms of evaporation and dehydrating have come into use, and through common usage have come to express or stand for different methods of drying. In the following pages they are employed with more specific meanings, as follows:
Drying : This refers to the practice of sun drying, or drying by exposure to the sun.
Evaporating : This refers to the method of drying by artificial heat.
Dehydrating : This refers to the method of removing the surplus moisture by artificial air-blast. The third term, however, often includes the second, as drying by a blast or current of air is more rapid where the air is heated. The air, however, is the chief agency in removing the moisture and the temperature used is usually much less than that where evaporation alone is done, as the air current method naturally tends to keep the temperature down. Dehydrating, or the new method of drying, has, like the newer methods in canning vegetables, brought the introduction of some newer terms which are not as yet universally known to the housewife. Some of these areas follows:
Preparing : Getting the vegetables ready for drying by carefully sorting; discarding all that are old and tough or injured, carefully washing or scrubbing, etc.
Blanching : Many vegetables and fruits need this preliminary treatment for drying or dehydrating as well as for canning.
Dipping : Plunging into cold water after blanching, to start the skins or fix the color and flavor.
Slicing : This is a very important part of fixing vegetables by the drying method. They must be cut into thin pieces or small parts to dry out evenly. Were the attempt made to dry them in large sections, they would merely wilt or shrivel on the surface, while the interior would be little changed ; in fact, one of the chief reasons for the existence of the skin on most fruits and vegetables is to prevent evaporation. The vegetables should be sliced thin enough, but not too thin 1/8 to ½ of an inch is about right. This will be thin enough to expose a large amount of surface to the air to dry, without giving a product that cannot be handled without sticking together and being in general messy when sliced too thin or cut into too small pieces the product is likely to lose its flavor and also fail to come back when re-soaked for use, so that it can be used to advantage in cooking.
Cutting and Shredding : Vegetables which are not suitable for slicing are prepared by cutting into small cubes, or in some cases are cut into fine shreds. Vegetables which have to be partly cooked before drying, or in some cases, prepared by pulping or passing them through the meat grinder, to prepare them for drying.
Drying : Drying out the prepared product in the apparatus which has been prepared to utilize either sun heat, artificial heat, or air-blast.
Conditioning : After the product has been dried to as nearly the condition wanted as possible, it will be found in most cases that the degree of dryness obtained will not be absolutely uniform throughout the batch. To make certain that all parts are dry enough, and to make the degree of moisture as uniform as possible it is conditioned by keeping the product in shallow open boxes for a few days, and occasionally turning it over or changing it from one tray to another. If the product is found to be not sufficiently dried out, as is sometimes the case, it is returned to the drier for further treatment.
Containers : Containers in which the finished dried product is to be stored and kept for future use may be glass jars, crocks, or specially prepared paper, or in fact anything which is convenient or may be covered tight enough to prevent any insects or worms from getting into the product. These containers do not have to be, as in canning, absolutely air-tight.
Success in drying, evaporating, or dehydrating vegetables or fruit will depend to a very great extent on having apparatus which is adapted to the work that is to be done. This does not mean that it is necessary to invest a considerable amount in equipment before drying can be undertaken. There are now manufactured for home and community use a number of machines of various sizes that cover a wide range of prices. Many of these are not very expensive and are very convenient to use, and efficient. It is entirely feasible, however, to construct an apparatus, if one is at all handy with tools, that will answer for home purposes. Herewith are illustrated three types of driers of home-made construction. The first of these is suitable for the sun-drying process of fruits or vegetables; the second, for evaporation by artificial heat and the third for dehydrating by air-current. These show plainly the principles on which the work is accomplished
Drying in the Sun : Except where the climate is such that long periods of hot dry weather without rain or heavy dews may be counted upon, sun drying is uncertain unless some means is taken to provide protection from occasional showers and also from blowing dust, insects, etc.
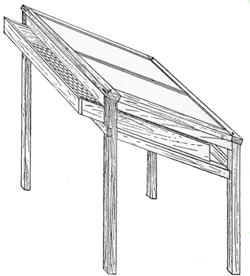
A Homemade Stove Drier with removable wire tray or rack. Outside is covered in metal
A contrivance of this kind is shown in the illustration. This shows a frame covered with a “Baby” or “Junior” sash, such as are used in many home gardens. A larger-sized drier can be made to accommodate a standard cold-frame sash; or if one has a suitable place for doing the work the products may be simply spread in the bright sunshine under cover, on pieces of muslin or paper. Drying may be done in trays alone, of convenient size for the product to be handled, but this process will necessitate much more careful watching, covering up, etc.
A Homemade Stove Drier with removable wire tray or rack. Outside is covered in metal
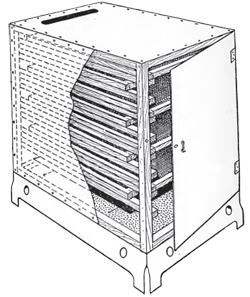
Evaporation by Heat : The heat of the cook stove can be used – often in connection with cooking – so that no additional expense is necessary for fuel, for evaporating. The simplest equipment for this work is the use of large plates or pans in the oven, with the door open, or at the back of the stove. These, however, are inconvenient and risky. It will be better either to get a commercial drier or to make one at home similar to that illustrated. This is merely a box on metal legs, containing a number of light trays, which may be set upon the stove, the heated air passing up through the trays and around the product. There are many other inexpensive driers on the market for use over coal or gas stoves; the smaller sizes may be bought for a few dollars each. Before attempting to make a home-made drier, one should be satisfied that he cannot find among these something which would serve the purpose better than a home-made affair, at little or no more cost, all things considered.
Dehydrating by Air-current : For this purpose, in the home an electric fan is usually made use of. This has proved very efficient, provided suitable trays for keeping the products separated, so that the air-current will pass through them most effectually, are arranged. The effectiveness of the fan method of drying as compared to hot air over the stove will be surprising to those who try it for the first time. The cost of running the fan in many instances will be but eight to ten cents a day. Many things can be dried sufficiently within a few hours. The arrangement of the fan and trays is shown in the accompanying illustration. The fan where used is likely to prove more satisfactory than heat drying, the color and flavor being better preserved, and the product more uniformly made.
Process Of Drying
(1) Obtain the products, as for canning, as fresh, young and tender as possible. Pick over and grade carefully; wash all products that may need it and thoroughly clean and peel or scape root products to avoid possibility of strong acid flavor in the dry products.
(2) Slice, cut, shred or “pulp” the product, as may be required.
(3) Blanch, or par-boil and cold-dip, as required, and place in trays ready for drying.
(4) Dry carefully for the required length of time. Examinations should be frequent and occasional turning may be necessary. Be sure to keep sun–dried products carefully protected at all time from dust or moths. The product should be taken in each night before sunset and put out each morning after the dew is off. There should be a protecting cover of light cheese cloth, mosquito netting is not fine enough, which should be kept over the product to prevent moths or other insects from depositing their eggs, with the result that a large part or all of the product may be spoiled afterward while in storage. The Indian meal moth, which is about 3/8 of an inch in length and is gray and copper brown in color, is the insect which causes most injury to dry vegetables and fruits. A close second is the “ fake moth,” about the same size, but a darker gray. Both are night flyers and are likely to attack the product about dusk. The eggs hatch within ten days, with a new generation about every two months thereafter; so that just from a few eggs originally the whole product may be completely spoiled. In evaporating by heat, care should be taken to avoid too high a temperature at first, as this may cause the freshly cut surfaces to be sealed up, with the results that the piece do not dry out evenly and a poor product results.
Start the heat slowly and raise it gradually to 140 to 150 °. This is high enough to do the drying as rapidly as it should be done, and will also destroy any insect eggs which may be present. To keep track of the degree of heat in the drier a thermometer, preferably an oven thermometer, should be used. If you do the work without a thermometer, it is risky, as the temperature varies rapidly and scorching may be the result.
When dehydrating by air-current, for reasons already explained, a high temperature in the drying of vegetables or fruit is objectionable. They will not dry, even if a correspondingly longer time be given them, without a fairly rapid movement of the air about them. This is because the moisture evaporating from the freshly cut surfaces soon saturates the air, which acts like a blanket and checks the evaporation. The result is that the right conditions for the growth of molds are created, and the product is soon spoiled. If, however, the moisture-saturated air is removed – by having a current of air blown over the vegetable – as fast as it is saturated, evaporation will continue at a rapid and steady rate until the product is uniformly and sufficiently dry. With large commercial evaporators, great care has to be taken not to take out too much of the moisture ; but there is little danger of this with the home air-blast equipment. The layer of products should not be so thick that they will not dry through evenly, and, if necessary, should be stirred up or turned over occasionally.
(5) Remove from drier. Experience only, in this as in many other things, will teach the operator just when the right condition or degree of dryness has been obtained. In commercial dehydrating, from seven to twelve per cent, of the water content is allowed to remain in the product. There is no way of determining this in the home drier; but one of the tests, to show when this condition has been reached, is to snap one of the pieces and see if it is impossible to press any of the juice from the freshly cut end. The natural “ grain ” of the vegetable or fruit should also have disappeared; but it should not be so dry as to be absolutely brittle; it should be, rather, slightly leathery.
(6) It is necessary also, to get a product that will keep well and that will not mold, to have it dried uniformly through and through. When the product has been dried sufficiently, as nearly as can be judged, “ condition ” it for a day or two, if necessary redrying all parts that appear to be still too moist.
(7) Put the product in the containers in which it is to be kept. If the product has been sun dried, it should be sterilized before being stored by heating to a temperature of about 140 ° F. If dried by artificial heat or air current, the product should be heated again for a short time after conditioning, as an added precaution. All containers for dried products need not be airtight, but they must be tight enough to protect the contents from outside moisture. Having small containers is of advantage in many ways. A pint jar of the dried products will go several times as far as a pint of canned products. It is advisable not to have the package so large that the contents, after it is once opened, will not be used in a comparatively short time. In case of insects, also, the damage is likely to be localized if small containers are used. For many things paper bags make satisfactory containers if they are filled only about halffull, the upper portion of the bag being twisted tight, bent over and tied with a string. A wide flat brush and melted paraffin may be used to paint the bags over to protect them against penetration of moisture; or paper bags may be used and these kept in tin or other containers to protect them, one bag being taken out at a time. An ordinary tin pail or lard pail will accommodate a number of bags, sufficient for a good many meals. Label everything carefully; labeling is important even in canning, but it is easier to distinguish what the canned goods are than dried products. Have the labels ready to tag everything as it is put up; and until you are familiar with the work of drying or dehydrating, it will be well to put on the labels also, data as to the length of time the product wasdried, etc., as a guide for future work.
(8) Examine before storing. Products which seem perfectly dry when put away, sometimes will be wet after they are put into the containers–with the result that they will begin to mold almost immediately and be spoiled. As a precaution against this, a sample of all products put away should be examined carefully about twenty-four hours after being packed; if there is any sign of moisture being present still, the batch must be put back for further drying.
Instructions For Different Vegetables And Fruits
Keeping in mind all that has been said in regard to the necessity for getting the product while young and tender, and using it immediately, the various garden vegetables may be dried according to the following directions. The time given is approximate, as the time required will vary and the product should be carefully watched during the process of drying, and taken off or kept on until it seems to be in the right condition, regardless of the length of time it has been under treatment.
Beans : Prepare carefully, snap or slice into ½ or 1 inch pieces, and dry. Or: Grade carefully, picking out the youngest and tenderest to be dried whole. Slice remainder into ½ to 1 inch lengths; blanch six to ten minutes, with a teaspoonful of soda added to each gallon of water, as this helps to keep the color. Dry in towel or breeze to remove the surface moisture, and then evaporate or dehydrate for two hours or more, depending on the maturity of product. Give a temperature of 110 ° raising gradually to 145 ° Or: Whole tender pods may be strung on a coarse strong thread and the strings dried above the stove or out of doors in the sun; it is not as satisfactory as either of the two preceding methods.
Lima Beans : Gathered while still young and plump, may be dried to give “fresh” beans in the winter. Remove from pods, wash and blanch from five to ten minutes, depending upon size and maturity. Surface dry and then evaporate or dehydrate for from 3 to 3 ½ hours, at a temperature of 110 rising to 145 °. Dry shell beans, peas, and cow peas may be treated in the same way. They may be made safe for winter storing by heating for ten minutes or so, beginning at 120 and rising to 180 °F this heat treatment will destroy insect eggs which otherwise are likely to hatch and destroy the stored products. (The germination of the product is likewise destroyed, so that it cannot be used for seed.)
Beets : Scrub thoroughly or peel, cut into slices about 1/8 inch thick, and dry. Or: Boil in skins until nearly done; dip in cold water, remove skins, and slice or cube. Dry 2 ½ to 3 hours, at 110 rising to 150 ° F.
Brussels Sprouts : Remove stems and loose outer leaves, slice, blanch –with a pinch of soda in water–and dry as for cabbage.
Cabbage : Use firm heads of cabbage, remove loose outer leaves, and the inside core, slice remainder with sharp knife or krout cutter and dry. Or: Prepare as above, shred into slices 2 or 3 inches long; blanch for ten minutes; and dry for 3 hours at 110 to 145 ° F.
Carrots, Kohl-rahi, Salsify and Celeriac : Wash, peel, cut into slices about 1/8 inch thick and dry. Or: Scrape, pare, slice and blanch for about five minutes ; dry off surface moisture and dry for 2 ½ to 3 hours in the same temperature as for beets.
Cauliflower : Use firm, clean heads; cut out the individual flowers; remove stems; blanch for six minutes; dry for 2 to 3 hours at 110 to 145 ° The product will turn black but will regain its natural color when re-soaked. Excellent for omelettes and soups.
Corn, Sweet : Blanch to set the milk in the kernels–two to five minutes. Remove kernels carefully, and dry, stirring occasionally to get an evenly cured product. Or: Boil or steam to set the milk thoroughly–eight to ten minutes–with a teaspoonful of salt to improve the flavor. Cut the grains crosswise with a sharp, flexible knife, and remove remainder with scraper, being careful to avoid husks and chaff. Dry 3 to 4 hours, at 110 to 145 ° Both these methods are for either evaporating or dehydrating. To dry in the sun, cure in the oven for ten to fifteen minutes and then put on sun trays or in a sun–drier.
Corn, Field : If taken when tender and suitable for roasting, may be cured in the same way, giving a fairly palatable product.
Greens (Spinach, Swiss Chard, Mustard, etc.) : Prepare carefully. While the whole leaves can be dried, a better product may be obtained by slicing before drying–especially beet tops, swiss chard, celery, etc., which have a thick stalk or stem as well as the leaf. Cut into sections about ½ inch long. Blanch, if desired, to help retain color.
Herb : Parsley, mint, sage celery-tops, and so forth, are easily dried. Blanching is not necessary. Dry either whole or after slicing.
Okra : Blanch three minutes, with soda added to water–a teaspoonful to a gallon. Dry from 2 to 3 hours at 110 to 140° Young fruits may be dried whole. Older ones should be cut, after removing stem, into slices 1/8 to 1 ½ inch thick. Young and tender fruits may be dried on a string as suggested for peppers.
Onions and Leeks : Remove loose, outside skin with roots and tops. Slice (under water if desired) into 1/8 inch pieces, loosen rings, and dry at once. Or: Wash, peel and slice and blanch for five minutes. Remove; dry off surface moisture, and dry from 2 ½ to 3 hours at 110 rising to 140 ° F. Leeks, on account of their different shapes, may be sliced into 1 ½ inch strips, instead of being cut across.
Peppers : Place peppers in pan in oven until skin loosens, or steam until skin is soft. Remove skin; cut in two; remove seed; and dry very slowly at a temperature of 110 increasing to 140 ° F. Very small varieties may be dried whole in the sun, or partly in the sun and finished in the drier, or strung on a string as suggested for beans.
Potatoes : Either white or sweet potatoes may be easily dried. This method is particularly good for sweet potatoes, which are rather hard to keep under ordinary conditions as compared to white potatoes. Scrub thoroughly and boil or steam until nearly done. Remove jackets, and either pass through a meat grinder or a ricer, or slice into pieces about ¼ inch square. Dry until quite brittle. Toast very slightly in open oven before storing.
Rhubarb : Wash, skin leaf-stalks, and cut into pieces ¼ to ½ inch in length. (Some people prefer the skin left on, which gives the rhubarb a pink appearance when cooked.) Blanch as briefly as desired to help retain color. Rhubarb, being one of the most prolific of all the garden vegetables, is usually wasted. This is an easy way to save it.
Soup Mixtures : In drying, the different vegetables are not prepared together, as they are in canning, but each is dried separately. The dried products may be mixed in the proportions wanted, and stored in that way. Carrots, onions, celery, okra, potatoes, and cabbage are the vegetables most often used for this purpose. The proportions may be arranged, of course, according to taste.
Squash and Pumpkins : Remove seeds and centers. Cut into pieces and pare these, and cut again into small strips or shreds about ½ inch thick and 2 inches long. Dry thoroughly. Or: Cut into ½ inch strips; blanch for 3 minutes; and dry for 3 to 4 hours, the temperature rising from 110 to 140 ° F.
Fruits
While commercial dried fruits are for the most part sun-dried, nevertheless they are equally well suited for evaporating or dehydrating, the latter method usually giving a better quality product.
Apples, Pears, and Quinces : These “hard” fruits are all easily dried, except that in the case of apples, very early and sweet varieties are not so good as the long-keeping varieties. The simplest method of preparing apples is to core, and slice ½ inch thick–preferably with a machine. Dip at once into water, to which salt has been added in the proportion of eight teaspoonfuls to a gallon. Dry off surface moisture, and then spread on papers and dry in sun until product has become tough and leathery. For drying in heat, prepare and cut into eighths, putting at once into cold water to which salt–one ounce to the gallon–has been added. Dry out gradually in a temperature of 150 ° Allow four or five hours, or as much longer as may seem necessary. For dehydrating, slice into 1/8 to ¼ inch thick rings, or shred as directed for sweet potatoes. Pears may be treated in the same manner except that they should be steamed for ten minutes or so before drying. This applies also to quinces.
Cherries : Wash and pit, if a large variety is being used. Small cherries may be dried with the pits in. Spread out thin and dry in sun. Or: Wash, rough dry, and spread in very thin layers with pits in and dry from 2 to 4 hours with temperature of 110 to 150 ° F.
Peaches : A better product is obtained if the fruits are peeled before drying. Remove stones, pits, and cut into halves, or smaller pieces if large fruit is being used, and spread on trays to dry. In evaporating or dehydrating, use same temperature as for apples.
Plums and Apricots : For plums, remove pits, cut into halves, and dry. Or: Cover with boiling water; let stand for 20 minutes ; drain ; rough dry ; and dry for 4 to 6 hours, gradually raising the temperature from 110 to 150 ° F. Apricots may be treated in the same way. Only varieties with good, thick solid flesh are suitable for drying in this way.
Raspberries : Prepare carefully, spread thinly, and dry until the fruit can be pressed between the thumb and finger without making a stain. Do not dry until hard. Or: Prepare carefully, spread in thin layers, and dry slowly in heat, gradually raising the temperature from 110 to 125 ° F. The temperature should not be allowed to go above 130 for the first hour or two, until the fruit is fairly well dried, as otherwise there will be loss of juice by dripping. Dry from 2 to 4 hours at 140 °
Blackberries, Dewberries, and Huckleberries : should be given the same treatment.
The following time table shows blanching time for vegetables and the approximate time required for drying vegetables and fruits, with temperatures to be used in drying by artificial heat:
| Blanching
Time Minutes |
Drying
Time Hours |
Temperature (Farenheit) |
|
| Vegetables | |||
| Asparagus | 5 - 10 | 4 - 8 | 110 - 140 |
| Beans, Green String | 6 - 10 | 2 - 3 | 110 - 145 |
| Beans, Lima (Young) | 5 - 10 | 3 - 3 ½ | 110 - 145 |
| Beans, Wax | 6 - 10 | 2 - 3 | 110 - 145 |
| Beets | Till Skin Cracks | 2 ½ - 3 | 110 - 150 |
| Brussel Sprouts | 6 | 3 - 3 ½ | 110 - 145 |
| Cabbage | 10 | 3 | 110 - 145 |
| Carrots | 6 | 2 ½ - 3 | 110 - 150 |
| Cauliflower | 6 | 3 - 3 ½ | 110 - 145 |
| Celery | 3 | 3 - 4 | 110 - 140 |
| Kohlrabi, Celeriac, and Salsify | 6 | 2 ½ - 3 | 110 - 150 |
| Leeks | 5 | 2 ½ - 3 | 110 - 140 |
| Okra | 3 | 2 - 3 | 110 - 140 |
| Onions | 5 | 2 ½ - 3 | 110 - 140 |
| Parsnips | 6 | 2 ½ - 3 | 110 - 150 |
| Peas, Garden (Mature) | 3 - 5 | 3 - 3 ½ | 110 - 145 |
| Peas, Sugar (Young) | 6 | 3 - 3 ? | 110 - 145 |
| Peppers | 110 - 140 | ||
| Pumpkin | 3 - 4 | 110 - 140 | |
| Rhubarb | 3 | 110 - 145 | |
| Spincah , Parsley, And Other Herbs | 4 - 6 | 3 | 110 - 145 |
| Summer Squash | 3 | 3 - 4 | 110 - 140 |
| Sweet Corn | 5 - 10 | 3 - 4 | 110 - 145 |
| Swiss Chard | 3 | 3 - 4 | 110 - 140 |
| Tomatoes | To Loosen Skin | 110 - 145 | |
| Fruit | |||
| Apples | 4 - 6 | 110 - 150 | |
| Apricots | 4 - 6 | 110 - 150 | |
| Berries | 4 - 5 | 110 - 140 | |
| Cherries | 2 - 4 | 110 - 150 | |
| Peaches | 4 - 6 | 110 - 150 | |
| Pears | 4 - 6 | 110 - 150 | |
| Plum | 4 - 6 | 110 - 150 | |
| Quinces | 4 - 6 | 110 - 150 | |

– Check Out Our –
– Other Websites –


– Check Out Our –
– Featured Articles –