Boy Mechanic Book 3
800 Things For Boys to Do
Popular Mechanics Press © 1919
How to Make Hammocks
By: Charles M. Miller
PART I – A Twine Hammock
When Making a Hammock with the Simple Overhand, Flat Reef, or Solomon's Knot, Loop All the Pairs of Cords at the Center about a Rod
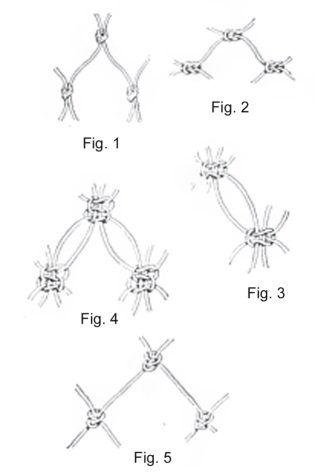
Cord hammocks may be made in two or more different ways, the knots being formed by the simple over-hand tie, Fig. 1; the flat reef knot, Fig. 2 ; the Solomon's knot, Fig. 3, or by the triple throw-over, Fig. 4; or they can be knotted by the process known as netting. Fig. 5, in which a special needle, or shuttle, is used.
In using any one of the first three methods of making the knots it is necessary to have cords arranged in pairs and long enough to reach from one end of the hammock to the other, allowing only sufficient length for the take-up in tying the knots and the spread of the meshes. The overhand knot is large, and the Solomon's knot is a little unwieldy, but is considered more beautiful when tied. The flat reef knot is small, is easily tied and will not slip. The netting process has a good knot and has the advantage of a short single cord, as the meshes are made in- dependently and the cord is carried on the netting needle.
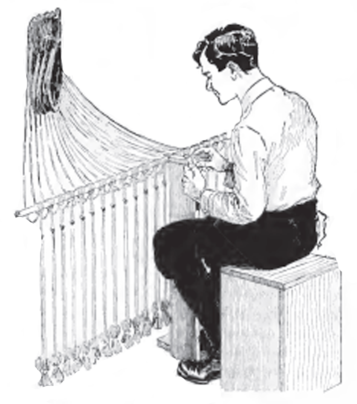
It is a great advantage, when making a hammock with the simple overhand, the flat reef, or the Solomon's knot, to loop all the pairs of cords at the center about a rod. Fig. 6 – which may be any stick such as an old broom handle – knotting from the center toward each end, one side being tied, and then the other. When the first pairs are being tied, the opposite ends should be looped up together out of the way. Even half the length of a hammock makes a long cord to be drawn through each time a knot is tied, and each string can be wound about the fingers into a little bundle and secured with a half hitch, using the same cord, and left hanging, as shown in Fig. 7, allowing sufficient cord free to throw large loops in the tying, and to make about 10 additional meshes.
About 3 ft. would be a good length to be left free. It will be necessary to have 24 pairs of cords – 48 cords in all – each 18 ft. long to make a hammock by the first two methods of tying the knots. Seine twine of medium-hard twist and 24-ply can be obtained from a store carrying sporting goods, and is about the best material to use for this purpose. When these pairs of cords are looped on the center rod, and the rod has been anchored to a wall, as shown in Fig. 8, begin by placing the mesh stick, or rather the mesh post. Fig. 9, between the first pair of cords, A and B, at the left end of the center rod, as in Fig. 8 and Fig. 6. The simple device illustrated in Fig. 9 is very useful for tying any one of the three first-described knots. The device needs no explanation other than the illustration. It will be seen that there are two sizes on the top of the post; the smaller is for the first time across only. The mesh post should be of convenient height for a person when sitting on an ordinary chair. One foot rests on the base as the tying proceeds, but there is no pulling over, as the tie draws both ways on the post, this also doing away with the pull on the center rod.
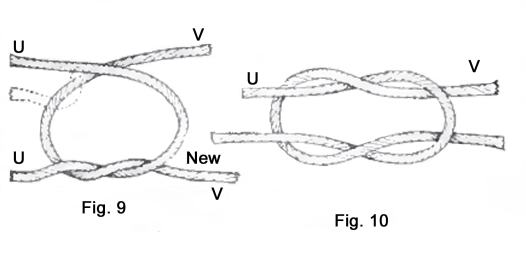
The cord to the right, B, is taken in the right hand and thrown over the left cord A, Fig. 8, and is held by the left hand. The left cord A is then tucked down behind the right, as shown in Fig. 10. If the right cord goes over in making the first loop, the same cord B must also go over in the second throw, as in Fig. 11, in order to have a proper square knot that will not slip. The end of A is then tucked under B, as shown by the dotted lines. This makes a very serviceable knot for the hammock, but can be also used for other purposes. The knot is shown in Fig. 2. Draw it up tightly, very hard, for knotting is not worth much if it is not tied well.
In case the simple overhand knot is preferred, the mesh post is placed between the first pair as before, and cords A and B are brought to the front as in Fig. 13, but are carried parallel into a large loop that is thrown over as illustrated, then tucked up through as indicated by the dotted lines. The thumb and first finger of the left hand now slide up to the point P, while the right hand pulls up the loop as it nears the finish, the thumb and first finger crowding the loop down hard against the mesh post. The small part is used for the first row across. The knot formed is shown in Fig. 1.
The Simple Overhand. Flat Reef. Solomon's Knot, Triple Throw-Over, and Netting Ties
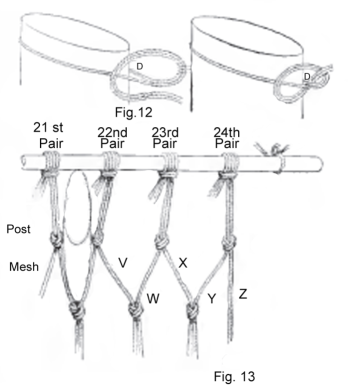
After tying the first pair of cords, using the knot preferred, slip the first mesh so made off: the tying post and place the post between C and D, which is the next, or second, pair. Tie the second pair and pass on to the third pair, which is E and F. Continue moving and tying until all the 24 pairs of cords have been similarly knotted in their first mesh. The last knotting will be the twenty-fourth pair, which is represented by the cords marked Y and Z. Instead of tying cords of the same pairs on the return trip across, one cord Y of the twenty-fourth pair is tied with one cord X of the twenty-third pair, and the other cord W of the twenty--third pair is tied with the cord V of the twenty-second pair, and so on across the series.
On the second row of tying, the post is first placed between cords Y and X and they are knotted together, but instead of tying about the small part of the post the larger size is used. After cords Y and X have been tied, cords W and V are combined. It will be seen that this is tying the pairs together instead of combining the two cords of the same pair. The third time across the combinations are the same as in the first row. The large mesh is used on all but the first row. The alternations of rows is continued until the cords are tied to within 2 ½ ft. of the end.

The Mesh Post Has Two Sizes on Its Upper End. the Smaller for Knotting the First Row of Meshes, and the Other for the Remaining Rows. This Illustration Also Shows the Manner of Tying the Knots
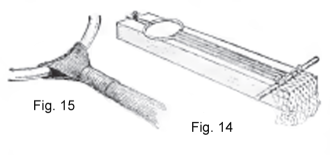
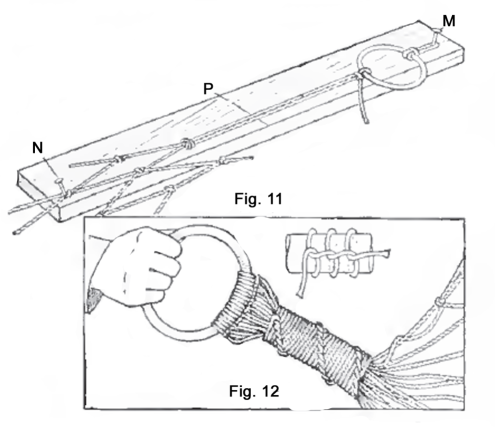
Pull out the center rod, insert it in the second row of meshes, loosen the ends that were looped up and begin the knotting of the opposite ends of the cords. When both sides are completed to within 2 ½ ft. of the ends, the center rod is removed and inserted in the last row of meshes. Another simple device will be found efficient, which consists of a board, 30 in. long, three or more inches wide and 1 in. thick, with three nails driven in slanting, as shown in Fig. 14, to prevent the ring and rod from slipping off as the tying proceeds. One 2 ½-in. galvanized ring will be required for each end. The ring is attached to the single nail at the end with a string. This will be found better than just slipping the ring over the nail, as it is necessary to have a little more play in putting the cords through for the tying. The distance from the rod to the ring should be 2 ft. The tie is made in pairs as before, one cord going under and the other over the side of the ring, using the flat reef knot. There will be a few inches of ends remaining after the tie is made and these are brought back to the main body of the cord and wound with an extra cord used for that purpose. The winding is started by looping the end of the extra cord, or string, about the whole bundle of cord together with the ends, pulling tightly and tying securely with the flat reef knot. This is illustrated in Fig. 15. The winding should be about 1 ½ in. long where the turned-back ends are cut off. Each time the cord is wound about the bundle it should be looped through its own winding and drawn tightly. This is practically the buttonhole loop. To finish the winding the cord should be given a double looping through its own winding; then with an awl, or other pointed tool, work a way through the underside of the other windings so that the end may be brought out farther back and pulled tightly, to prevent unwinding when the pull comes on the hammock. Attach the ring to the opposite end in the same manner and the hammock is complete.
Tying the Overhand Knot and How to Run the First and Second Rows Across
The edge can be bound the same as a tennis net, or a rope can be run through the outside meshes lengthwise, as desired. A very pretty effect can be obtained by knotting, in a similar manner to the body of the hammock, an apron fringe for the sides.
Attaching the Rings 'to the Ends of the Cords and the Binding near the Rings: All the Pairs of Cords are Looped about a Rod in the Center, and the Knots are Made toward the Ends
How to Make Hammocks
PART II – A Netted Hammock
A good hammock should be about 12 ft. long, which includes 8 ft. of network and 2 ft., at each end, of long cords that are attached to rings. Seine twine, of 2-1-ply, is the best material and it will take 1 ½ lb. to make a hammock. The twine comes in 1 � lb. skeins and should be wound into balls to keep it from knotting before the right time. Two galvanized rings, about 2 ½ in. in diameter, are required.
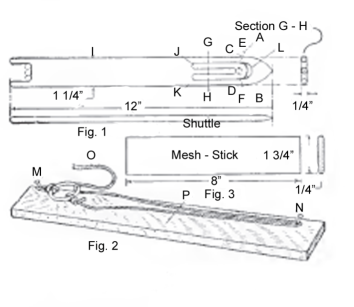
The Tools Necessary Consist of a Needle, or Shuttle, a Gauge Board, and a Mesh Stick
The equipment for netting a hammock consists of a wood needle, or shuttle, a gauge board for the long meshes at the ends, and a mesh stick for the regular netting of the main body of the hammock, all of which will be described in detail.
The shuttle is made of wood and is 12 in. long, 1 ¼ in. wide, and 1 ¼ in. thick. The best material to use is maple or other hard wood, but very satisfactory ones can be cut from good-grained pine. The sketch Fig. 1, shows the general shape of the shuttle, one end being pointed and the other forked. Lay out the pointed end before beginning to cut down to size. Place a compass at the center of the end, and with a radius of 1 ½ in. describe the arc AB. With the intersections of this arc and the side lines of the needle, C and D, as centers, and the same radius, 1 ½ in., cut the arc AB at E and F. With E and F as centers draw the curves of the end of the shuttle. The reason for placing the centers outside of the shuttle lines is to obtain a longer curve to the end. The curves can be drawn free-hand, but will then not be so good.
The space across the needle at GH is divided into five ¼-in. divisions. The centers of the holes J and K at the base of the tongue are 3 ½ in. from the pointed end. The opening is 2 ¾ in. long. Bore a ¼ in. hole at the right end of the opening, and just to the left three holes, as shown by the dotted lines. With a coping saw cut out along the lines and finish with a knife, file, and sandpaper. Round off the edges, as shown by the sectional detail. It is well to bevel the curve at L so that the shuttle will wind easily. The fork is ¾ in. deep, each prong being ¼ in. wide. Slant the point of the shuttle and round off all edges throughout and sandpaper smooth.
The gauge board. Fig. 2, is used for making the long meshes at both ends of the hammock. It is a board about 3 ft. long, 4 in. wide, and 1 in. thick. An eight-penny nail is driven into the board 1 in. from the right edge and 2 in. from the end, as shown by M, allowing it to project about 1 in. and slanting a little toward the end; the other nail N will be located later.
The mesh stick. Fig. 3, should be made of maple, 8 in. long, 1 ¾ in. wide, and ¼ in. thick. Round off the edges and sandpaper them very smooth.
The making of the net by a specially devised shuttle is called "natting," or netting, when done with a fine thread and a suitably fine shuttle. Much may be done in unique lace-work designs, and when coarser material and larger shuttles are used, such articles as fish nets, tennis nets and hammocks may be made. The old knot used in natting was difficult to learn and there was a knack to it that was easily forgotten but there is a slight modification of this knot that is quite easy to learn and to make. The modified knot will be the one described.
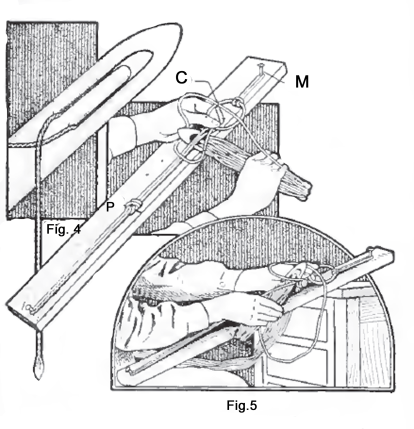
The shuttle is first wound by looping the cord over the tongue, as shown in Fig 4, then bringing it down to the forked end and up to the opening on the opposite side ; then the cord is again looped over the tongue and returned to the fork or place of starting. Continue winding back and forth until the shuttle is full. The shuttle will accommodate from 20 to 35 complete rounds. If the shuttle is too full it crowds in passing through the meshes and delays the work.
Attach one of the galvanized rings by means of a short cord to the nail in the gauge board, as shown in Fig. 2. At a point 2 ft. from the lower edge of the ring, drive an eight-penny finishing nail, N. Tie the cord end of the shuttle to the ring, bring the shuttle down and around the nail N; then bring it back and pass it through the ring from the underside. The cord will then appear as shown. A part of the ring projects over the edge of the board to make it easier to pass the shuttle through. Draw the cord up tightly and put the thumb on top of the cord O, Fig. b, to prevent it from slipping back, then throw a loop of the cord to the left over the thumb and up over a portion of the ring and pass the shuttle under the two taut cords and bring it up between the thumb and the two cords, as shown. Draw the looped knot tight under the thumb. Slip the long loop off the nail N and tie a simple knot at the mark P. This last knot is tied in the long loop to prevent looseness. Proceed with the next loop as with the first and repeat until there are 30 long meshes.
The Shuttle is First Wound and the Long Loops at One End formed over the Gauge Stick
After completing these meshes anchor the ring by its short cord to a hook or other stationary object. The anchorage should be a little above the level for tying the knots of the net. Tie the cord of the shuttle to the left outside loop and always work from the left to the right; and the first time across see that the long meshes do not cross over each other, but are kept in the order in which they are attached to the ring.
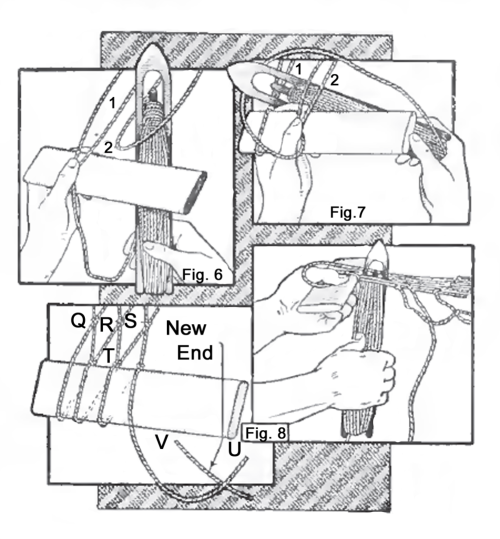
After tying the cord to the mesh 1, Fig. 6, bring the mesh stick into use. Pass the cord down over the mesh stick, drawing the lower end of the loop down until it comes against the upper side of the mesh stick and put the thumb down upon it in this position to prevent slipping. Pass the shuttle up through the loop 2 and draw that down to the mesh stick. Shift the thumb from the first position to the second. Throw the cord to the left over the thumb and about the loop 2, as shown in Fig. 7, and bring the shuttle under both of the cords of mesh 2 and up between the large backward loop and the cords of the mesh 2. Without removing the thumb draw up the knot very tight. This makes the first netting knot. Continue the cord around the mesh stick, pass it up through mesh 3, throw the backward loop, put the shuttle under and up to the left of the mesh 3 and draw very tight, and do not allow a mesh to be drawn down below the upper side of the mesh stick. Some of these cautions are practically repeated, but if a mesh is allowed to get irregular, it will give trouble in future operations.
After the Completion of the Long Meshes, the Ring is Anchored and the Mesh Stick Brought into Use.
Continue across the series until all of the long loops have been used and this will bring the work to the right side. Flip the whole thing over, and the cord will be at the left, ready to begin again. Slip all the meshes off the mesh stick. It makes no difference when the meshes are taken off the stick, but they must all come off before a new row is begun. Having the ring attached to the anchorage by a cord makes it easy to flip the work over. Be sure to flip to the right and then to the left alternately to prevent the twisting, which would result if turned one way all the time.
The first mesh each time across is just a little different problem from all the others, which may be better under- stood by reference to Fig; 8. The knots Q, R, and S are of the next previous series. The cord is brought down over the mesh stick and up through mesh 1, and when the loop is brought down it may not draw to the mesh stick at its center; it is apt to do otherwise and a sideway pull is necessary, which is pulled so that the knots Q and R are side by side, then the knot at T may be tied. When the mesh 2 is drawn down it should pull to place without shifting, and also all the others of that row.
A Square Knot is Used to Join the Ends of the Cord When Rewinding the Shuttle
Continue the use of the mesh stick until a net 8 ft. long is made. When the cord gives out rewind the shuttle and tie with a small knot that will not slip. The weaver's knot is good if known, or the simple square knot shown in Fig. is very good. It is too easy to make to need direction, but unless it is thrown over just right it will slip. Let U, Fig. 8, represent the short cord and V the new piece to be added. Place the cord V back of U and give U a complete turnaround V, Fig. 9, and bring them together at a point above U, then to the front. Repeat the complete turn of U about V, shown by the dotted line, and pull tightly. If analyzed, it consists of two loops that are just alike and linked together as shown in Fig. 10.
When the 8 ft. of netting has been completed, proceed to make the long loops as at the beginning. The same gauge board can be used, but the tying occurs at both ends, and since the pairs cannot be knotted in the center, two or three twists can be given by the second about the first of each pair. The long loops and the net are attached together as shown in Fig. 11. Slip one of the meshes of the last run over the nail N, and when the cord comes down from the ring, the shuttle passes through the same mesh, and when drawn up, the farthest point of the mesh comes against the nail. After this long loop has been secured at the ring, the first mesh is slipped off and the next put on. All of the long loops at this end will be about three inches shorter than at the other end, unless the finishing nail N is moved down. This will not be necessary.
With a piece of cord about six feet long, start quite close to the ring and wind all the cords of the long loops together. The winding should be made very tight, and it is best to loop under with each coil. This is shown in Fig. 13.
The hammock is now ready for use. Some like a soft, small rope run through the outside edges lengthwise, others prefer a fringe, and either can be added. The fringe can be attached about six meshes down from the upper edge of the sides. The hammock should have a stretcher at each end of the netted portion, but not as long as those required for web hammocks.
The Gauge Board is Again Used for the Long Loops at the Finishing End, Then the Cords are Wound.
– Check Out Our –
– Other Websites –


– Check Out Our –
– Featured Articles –