Moccasins 101
How To Make One-Piece Moccasins
Copyright 2008 Susannah aka Coogs - cougarwoman1 (at) hotmail (dot) com
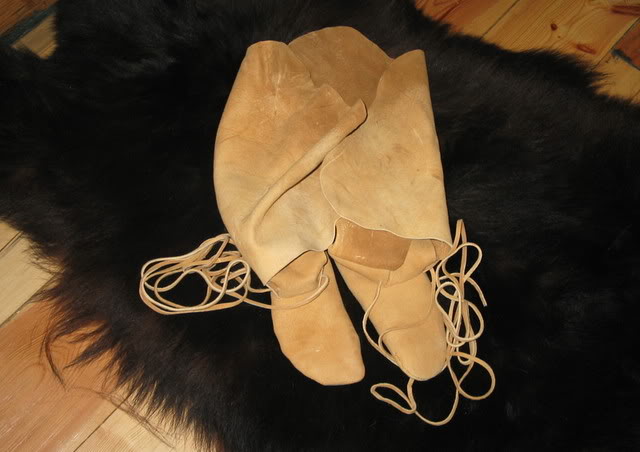
This tutorial provides instruction for making the one-piece hightop moccasins pictured above. This is just one way to make a pair of moccasins. Obviously there are many styles, many teachers, and many books from which to draw inspiration and instruction. I offer this tutorial as a give-away in gratitude to all who have shared their wisdom and knowledge with me. Please read through the entire tutorial before beginning. The degree of detail provided is with the beginner in mind. If you have some experience you will be able to skim over much of it. This is the first of five parts.
I would like to acknowledge the work of George M. White in his book "Craft Manual of North American Footwear" (1969). Particularly the chapter entitled "Salish (Flathead) Side Seam" (p. 48-49) influenced my work in this tutorial. In addition, big shout-outs go to Warrior Yeti, Texscout, and my awesome husband, all of whom provided me with valuable suggestions, personal insights, and necessary editorial recommendations. Their feedback boosts my confidence that the beginner craftsperson will find this tutorial helpful. Thanks a million guys!
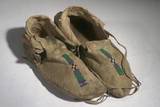
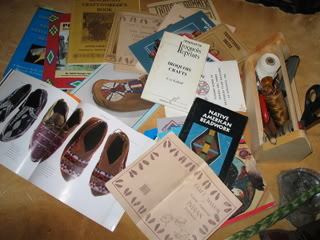
There are two basic moccasin styles used frequently by Nations whose traditional lands extend across the Plains of North America. In my own region of southern Alberta, the one-piece style (aka side-seam) is used by Blackfoot, Plains Cree, Stoney Nakoda and Tsuu T'ina Peoples. A search at the American Museum of Natural History Division Of Anthropology revealed these examples of one-piece moccasins from times past. They are marked as originating with Sioux, Blackfoot, Cree and Flathead Peoples, respectively:
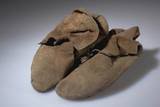
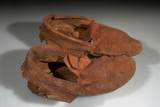
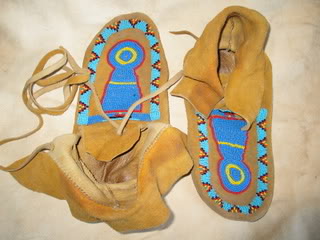
Benefits of the one-piece moccasin include ease of pattern preparation and moccasin construction, as well as flexibility in the height of the attached upper. A drawback to this style is that a worn-out sole cannot easily be replaced. The first moccasins I made were this style (note the Blackfoot "keyhole"-design beaded mocs below). I feel that beginner and advanced craftspeople alike can enjoy successful results with the one-piece moccasin style.
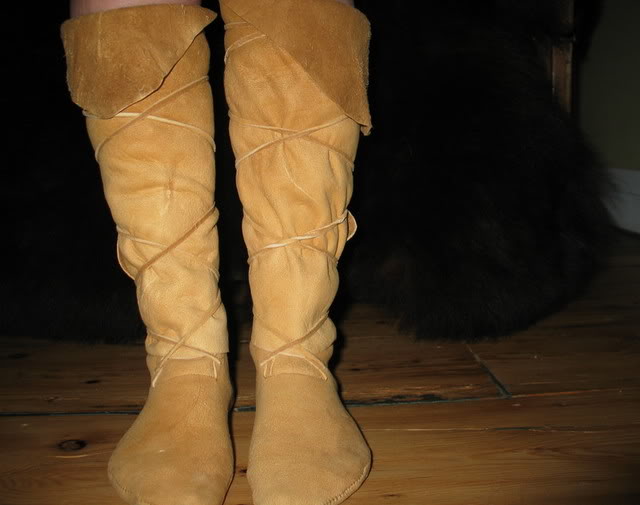
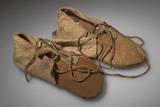
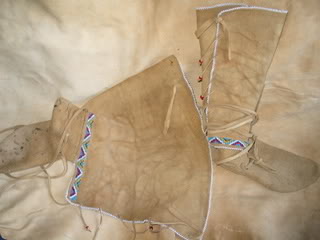
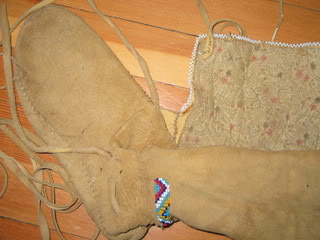
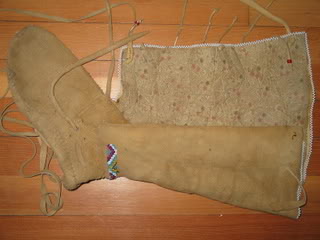
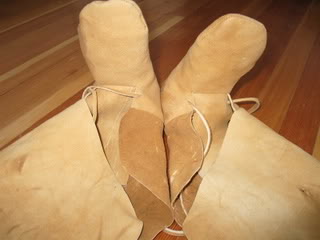
The following 3 photos demonstrate options for completing the one-piece moccasin. The first picture is of a moccasin with no attached upper; the ankle portion is simply folded and stitched down with beadwork covering the fold while the tongue is long and decorative. The second photo shows the side-seam with a short 2" upper, a single thong wrapped around the ankle, and a much shortened tongue. The third photo shows a 12" high upper, again with a single thong for wrapping, as well as a thong at the ankle and a tie at the top. These photos help demonstrate the versatility of the basic one-piece style.

Part 1 : Gathering Your Tools
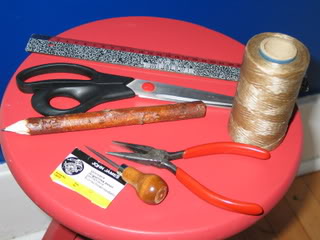
There are essential tools and some extra tools which, while not mandatory, may make your task easier. You may choose to make a trial pair of moccasins with fabric before you cut into your leather. The cut-off legs of an old pair of jeans or pants would work. I'd recommend this practice step to beginners or to anyone not familiar with this style.
What you need:
• Paper bag, newsprint or a cereal box to make your pattern, and a pencil for tracing and marking the leather. A ruler is also useful.
• Leather. Braintanned is best; check Vendor's Row or the Trade Blanket for purchasing options, or learn how yourself. Braintanned buckskin is the result of using natural products and smoke to create leather that's breathable, washable and wonderfully soft. Commercial (chrome-) tanned is next best and is of an even thickness but is neither breathable nor washable, nor is it the result of environmentally safe practices; however, it's cheaper to buy and sometimes more readily available. The size and quality of the hide, as well as which style of upper you choose, determines how much leather you need.
• Scissors. Good quality sewing scissors or sharp scissors which have NOT been used to cut paper are essential. You will need paper scissors to cut out the paper pattern as well.
• Glover's Needles. These are needles with a very sharp 3-sided point at the end which makes sewing through leather easier. I recommend a size #4 or #6.
• Sinew, real or artificial (my only experience is with artificial). I find it helpful to cut several 36 inch (approx) lengths, run them across an edge like a table top to flatten them, and then split them. Artificial sinew split 4 ways fits well into the eye of a #6 glover's needle. (I have no experience using other types of thread and I hesitate to recommend them.)

• A round awl (an icepick also works) for making holes for the thongs. Any sort of tool or implement which punches out a hole in the leather is NOT recommended.
• Needlenose pliers are useful for pulling the needle through thicker or more stubborn areas of the leather. Some people like to use a rubber finger (Example At This Link) with a piece of leather inside placed on their "social finger." Others prefer to use an "Inuit Thimble" (Tutorial Found Here). I use hockey tape to protect my finger and thumb from getting poked by the needle and also as a quick bandage after the fact. Blood from needle pokes is difficult to remove from leather.
• Scotchtape may be used to hold the paper pattern pieces in place on the leather, and string comes in handy to estimate the length of lacing you need for the uppers.
OK let's get to it.
But before you start hurrying, slow down. Sit for a bit with things that inspire you and bring a good feeling to you. Favourite music, beautiful art, inspiring thoughts, a soothing cup of tea can all be part of a meditative moment.Take it in for a few minutes and start to feel good about what you are going to do. Do this in a way that feels best and most natural to you. It will show up in your finished work.
Part 2: Making The Pattern
Stand on the paper or cardboard in your bare feet with your full weight. Trace each of your feet, making sure that the pencil is straight up and down and not slanted inwards towards your foot. Cut out the outlines. If your feet are of similar length and shape, you can use the same cut-out for both the right and left pattern. Otherwise, make a pattern for each foot, and label left or right.

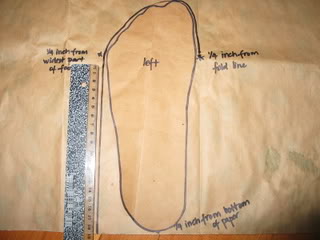
On another piece of paper that is at least twice as wide as your foot, line up the bottom edges exactly and fold it in half with a sharp crease. This crease will become the centre line. Place the outline of your foot with the big toe by the centre line. The widest part of your foot should be about ¼ inch from the centre fold-line and the heel about ¼ inch from the bottom of the paper. Make sure the outline is straight up and down or you will end up with crooked mocs. You can tape the outline to the paper.
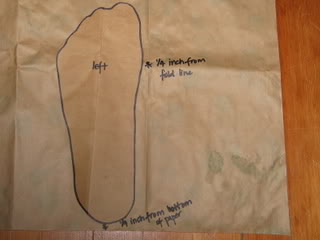
Draw a line ¼ inch from the outline, beginning at the toes and tracing down the short side towards the centre fold (ie the inside of your foot). Stop at the fold line. On the other side (ie the outside of your foot) make a mark that is ¼ inch wider than the widest part of your foot. Draw a line straight down from this point to the bottom of the paper, making sure the line is exactly the same distance from the centre line all the way down. This is the pattern for the Sole portion of your moccasins.
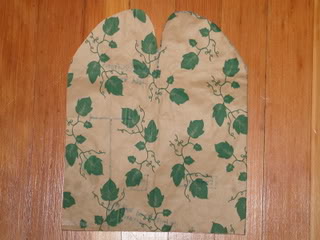
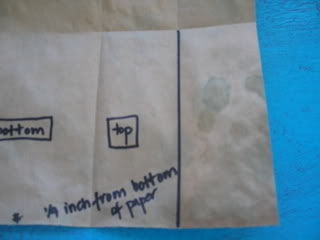
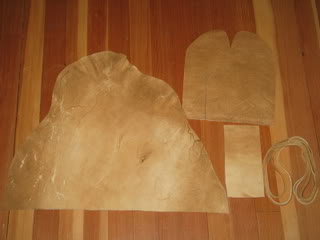
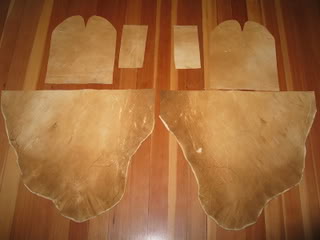
Cut out the Sole outline, starting at the bottom of the pattern and cutting around the toes until you get to the centre line. Now fold the pattern over at the centre line, and cut around the outline of the sole. When you open the paper you will have mirror images. Your pattern will look like this, with a Sole or bottom side, and a Top side:
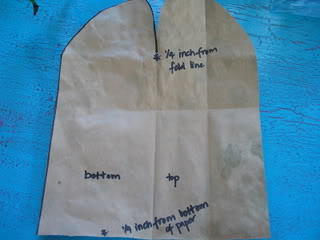
Take the Top part of your pattern and fold it in half lengthwise and again widthwise. Unfolded, the intersecting crease lines mark the centre of the Top, like this:
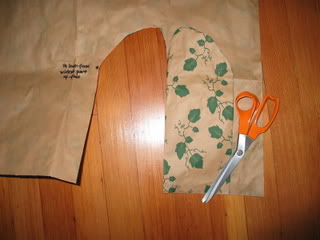
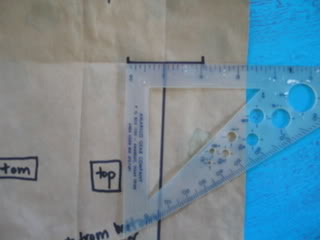
Using your ruler, draw a line from the bottom up to the centre crease, as shown in the first photo below. Now centre a 2 inch line (1 inch on each side of the vertical crease line) across the middle crease line, so you end up with a T, as in the second photo:
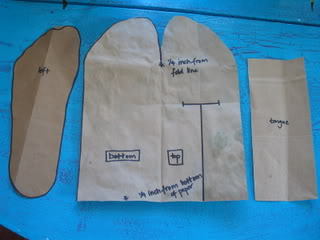
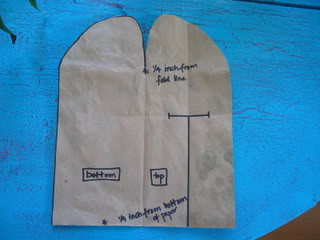
That's it for the boot part of your moccasin. Your finished pattern should look like this:
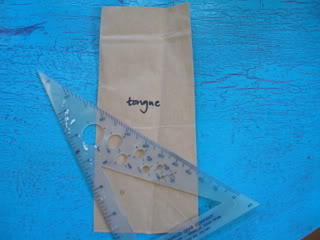
You can either prepare a paper tongue pattern or trace a pattern directly onto your leather with a pencil. It needs to be 3 inches wide by 4 to 6 inches long.
Note: Using this one-piece moccasin pattern you can choose an option for uppers from one of the three photographs shown in Part 1: Introduction. No upper, a short upper, or a tall upper all work and function well depending upon your preferences. If you choose to make an upper, first decide on the height you want (between ankle and knee height) and determine that height in inches. The width of the upper needs to be at least 6 inches more than the total width of your moccasin. To determine the width, lay out your moccasin pattern and measure across the widest part with a ruler and add 6 inches or more. This ensures that you have enough width to wrap around your leg. Uppers are typically trapezoid-shaped, with the widest part at the top of the moccasin and the narrower part stitched to the moccasin boot. You can either make a paper pattern for the upper or trace a pattern directly onto your leather.
For this project I've chosen a fourth option and that is to make irregular shaped uppers utilizing the hind-leg portions of a large deer hide.
Part 4: Cutting Out The Pattern
Whether you are using braintanned or commercially tanned leather you will notice that the two sides of the leather are different in appearance. You need to be consistent when choosing which side is the inside and which side is the outside of your moc. Typically, braintanned buckskin moccasins are made with the grain side facing out (the grain has actually been removed in the tanning process); the flesh side faces inwards and is closest to your own skin. Conversely, with commercially tanned leather the flesh ("suede") side is on the outside of your moccasins and the grain (smooth) side faces in towards your skin (the grain remains intact on chrome-tanned leather). The "right side" refers to the side that will be seen on the outside of the moccasin. In this tutorial, because I am using braintanned buckskin, the right side refers to the grain side.
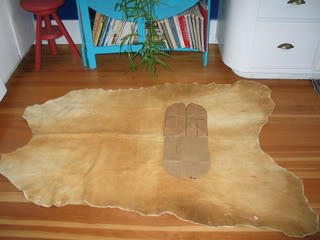
Lay out your hide on a large table or on the floor. Stretch it lengthwise, widthwise and diagonally-notice the differences in the amount of stretch. There are differing thoughts regarding placement of pattern pieces and where you want the stretch to be: widthwise or lengthwise. Do NOT place your pattern on the diagonal, and do NOT use the thin flank ("armpit") leather or you will end up with sloppy ill-fitting mocs. Check your leather on both sides for thin spots, scrape marks and other holes or weak areas. Try to avoid having those areas in places of strain or wear, like on the soles.
I placed my pattern pieces widthwise, like this:
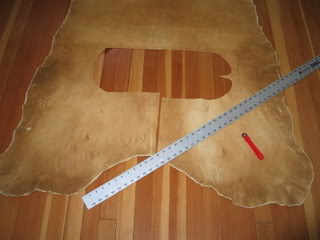
Use scotchtape or something heavy like a coffee mug to hold the pattern in place. Cut carefully and accurately. It is easiest to cut straight across the big toe area between the Sole and Top, and then cut out the "V" shape between them later.
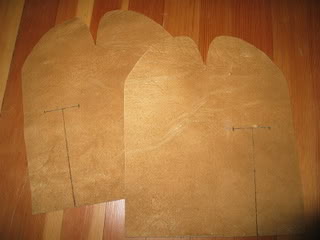
After both feet are cut out, label them right and left. Mark the "T" from the Top part of each moccasin pattern by making holes with the awl through the paper and the leather, along the "T". Then trace the T-shape on the inside of each piece with a pencil. Make sure (!!) before you mark the T on each moccasin that you do not end up with two moccasins for the same foot. (Don't ask.) Don't cut out the Ts yet (they are easier to sew this way).
Cut out the tongues and uppers if you are using them.
Note: As mentioned in the previous section, I wanted to utilize the natural shape of this particular hide and thus chose to make the uppers out of the hind-leg sections on each side of the deer hide. I cut each upper on the diagonal to get maximum length and width, measuring off the two sections as wide and high as possible.
In this way the stretch of the diagonally-cut leather is optimally used to wrap around the leg. It's important to note that you need a fairly large hide in order to make uppers in this way.
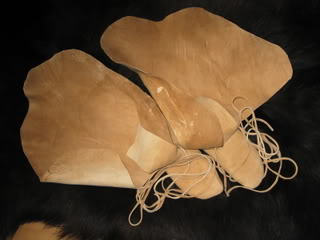
All of the moccasin pieces are now cut out:
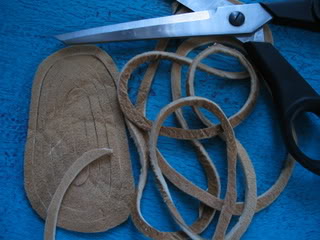
In addition to the feet, tongues and uppers, you need leather strings or thongs to wrap around your legs to hold the uppers in place. Thongs are ¼ to 3/8 inch wide, depending on the thickness of your leather. (Note: Do not use leather that is too thin or it will stretch and soon break.) The height of your uppers, the width of your calves, together with personal preference all determine the length of thongs you will require. You can take some string and play around with what you think would work best for you. For these high-top moccasins I made four 48 inch long thongs. From this piece of scrap leather measuring about 3" X 6" I cut 10 feet of lacing. Start at the outside edge of your circle and cut in a continuous spiral until you reach the middle.

Part 5: Sewing The Moccasins
For instructions on how to sew your moccasins together refer to the Whipstitching Tutorial at this link
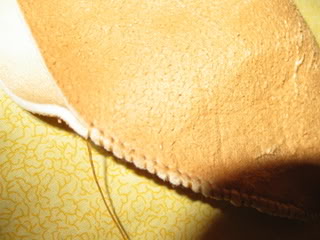
Sole and Top: With right sides together, whipstitch from the big toe down the short side to the centre fold line. Make your stitches about 1/8 inch apart and about 1/8 inch from the edge. Neat, evenly spaced stitches will show in your finished work and are worth the effort. Pulling each stitch snugly helps the sinew "disappear" into the leather. Cut off the sinew at the fold line.
Begin stitching again at the big toe and whipstitch down the long side all the way to the bottom. Keep checking to make sure the leather stays lined up at the bottom; it's easy for it to creep out of place.

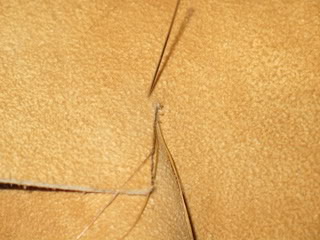
Now cut out the T.
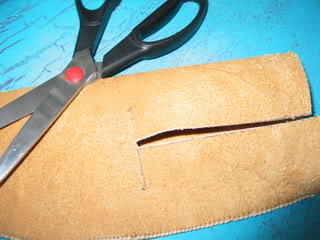
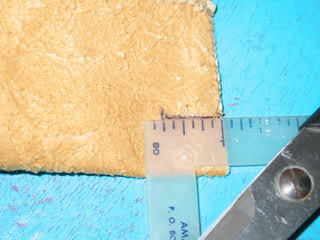
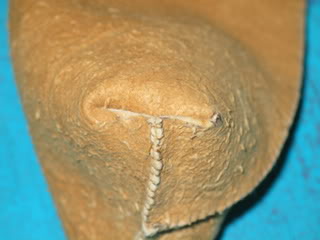
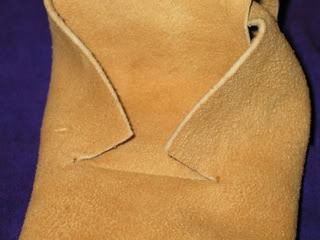
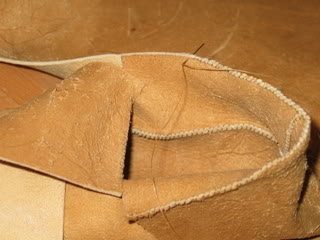
Heel and Tab: Fold your moccasin in half and whipstitch the back of the moc until you are ¾ inch from the bottom, as noted by the line drawn at the back of the moc in this photo:
Now take your scissors and make a cut ¾ inch long, straight across, on that line:
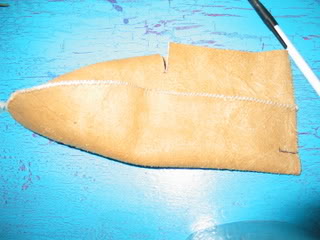
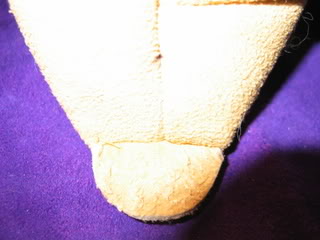
Stand the moccasin up and it will look like this. Note the tab you've created.
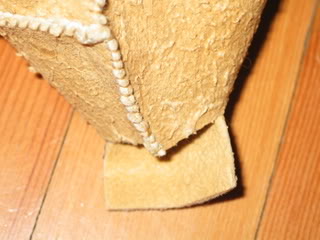
Now push the tab all the way through to the other side:
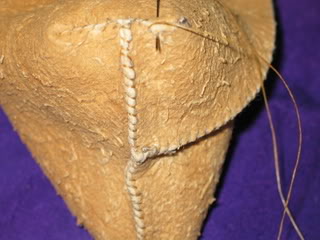
Whipstitch the back of the heel to the sole, from the inside:
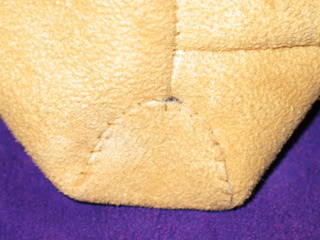
Now at last you can turn your moccasin right-side out. Run a wooden spoon firmly along the seams on the inside of the moc to smooth and flatten the seams. Put your moccasin on and pull the tab up the back of your heel until it is a smooth fit and mark that spot on the heel. Remove the moc and trim the corners of the tab to make it round.
Lining up the middle of the tab with the mark you just made, whipstitch it beginning at the top and down each side, making sure it stays centered on the back seam. When finished it will look like this:
Tongue: With your moccasin still right-side out, centre the tongue right-side down across the T in the top of the moc. Whipstitch the tongue and the top of the T together. There will be a ½ inch overlap at each corner.
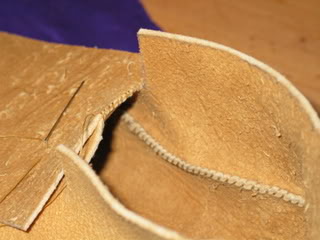
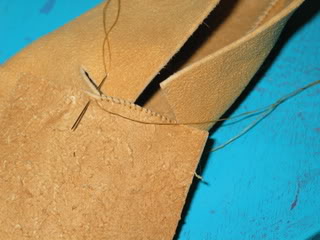
At each of the corners, put the tongue underneath the ankle part and stitch 3 or 4 reinforcing overlapped stitches to help prevent tears and stretching:
This completes the boot part of your moccasin.
Uppers: Sewing directions from this point depend upon the type of upper you chose. For regular trapezoid shaped uppers the widest part is at the top and the narrower part is sewn to the boot of the moccasin. The inside of the upper wraps over the outside. Specifically, on your right foot the upper wraps in a clockwise direction (from inside to outside, ie left over right), while on the left foot it wraps in a counter-clockwise direction (ie right over left). Whipstitch the upper to the boot with right sides together, beginning with the short side on the outside of the moc. You can see how this was done in the photos below:
Normally this is how uppers are stitched on, regardless of their height.
However, I had to make an adjustment in order to accommodate the unusual shape of the hind-leg section I chose for uppers on these moccasins. The widest part of the upper (ie the part that was cut straight) needed to be stitched to the boot, leaving the edge (ie the top part of the upper) to be folded over. Moreover, I wanted that fold to be on the outside of my leg rather than on the inside where they would rub together when I walk. Therefore, I whipstitched the short side of the upper to the inside of the boot, resulting in uppers which wrap outside over inside. Refer to the pictures below. Note that on the right foot the uppers wrap in a counter-clockwise direction (ie right over left) while on the left foot it wraps in a clockwise direction (ie left over right).
Thongs: Lastly, insert the awl through both the moccasin and the tongue as shown. Align the holes and insert the end of a thong and tie a knot in it. Repeat for the other three thongs.

– Check Out Our –
– Other Websites –


– Check Out Our –
– Featured Articles –