Taken From Boy Mechanics Book 2 – 1,000 Things For Boys To Do
Popular Mechanics Press © 1915
Part One : Shape of Shoes
To the inventive mind of the North American Indian we owe the snowshoe, and its conception was doubtless brought about through that prolific source of invention – necessity. The first models were crude web–footed affairs, but improvements in model and manner of filling the frames were gradually added until the perfected and graceful shoe of the present was finally reached. The first snowshoes were made by the Indians, and the Indians of Maine and Canada continue to fashion the finest models today.
The snowshoe is a necessity for the sportsman and trapper whose pleasure or business leads him out in the open during the winter season, when roads and trails are heavily blanketed by a deep fall of powdery snow. But the use of the web shoe is by no means confined to the dweller in the wilderness, since the charm of wintry wood and plain beckons many lovers of the outdoors to participate in this invigorating sport, and snowshoe tramps are fast growing in popularity in and about our cities and towns.
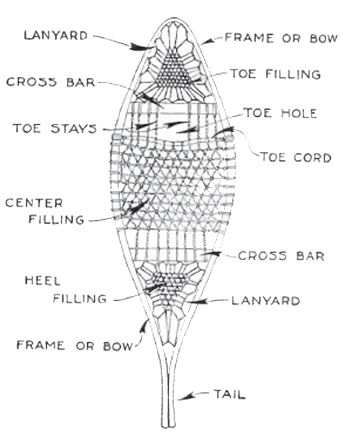
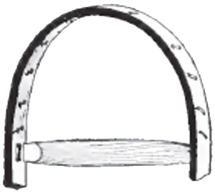
The frame of the snowshoe in its usual construction, showing the cross pieces with their lace fillings of hide and the different parts named for a ready reference
All the modern snowshoes are constructed upon practically the same general lines, although the types of frames differ considerably in size as well as in shape, and the filling of hide is often woven in many varied and intricate patterns. The frame or bow – usually made of ash in order to get strength with light weight – is bent in many shapes, but the one shown in the diagram is a typical general–purpose shoe, and may be called standard. The frame is held in shape by means of two wooden cross braces, neatly mortised into the frame. These braces are spaced some 15 or 16 in. apart, and so divide the shoe into three sections, known as the toe, center, and heel. The filling is woven into a lanyard, which is a light strip of hide firmly laced to the frame through a double row of holes drilled in the wood. The center filling is woven of heavy strands of rawhide, in a fairly coarse mesh, because this part of the shoe must bear the weight of the body and the brunt of wear. The end fillers for toe and heel are woven of lighter strands of hide, and the mesh is, of course, smaller.
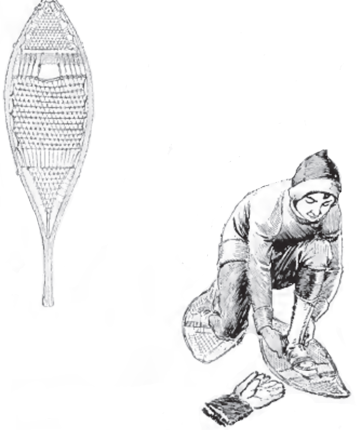
Style "A"
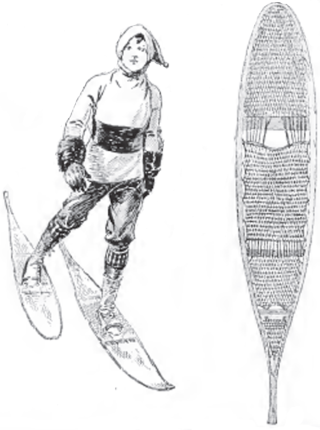
Snowshoe experts regard this as an extreme style, for it is long and narrow
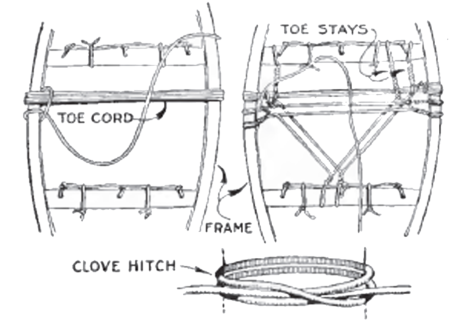
As may be noted by referring to the drawing, a center opening or "toe hole" is provided, and as the greater strain on the filling lies directly under the ball of the foot, the shoe is reinforced at this point by the "toe cord" running across, and the "toe–cord stays," which are tied in on each side of the toe hole – one end being fastened to the toe cord and the other lashed over the wooden cross bar of the frame. These reinforcing cords are formed of several strands of hide, the stays being again wound with finer strands.
To prevent slipping and to secure a good foothold while walking, the manner of attaching the foot to the shoe is of importance, and this is done by making use of a toe strap, which will allow the toe to push down through the toe opening as the heel of the foot is lifted in the act of walking. A second strap, or thong, leading from the top around the foot, above the curve of the heel, is needed to lend additional support in lifting the snowshoe, to effect the easy shambling stride characteristic of the snowshoer
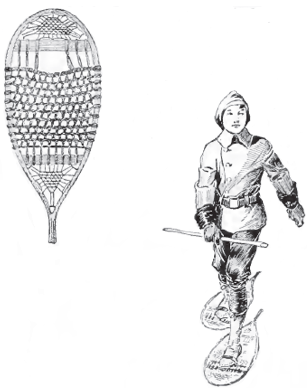
Style "B"
This style is considered the ordinary Eastern model and one best adopted for ordinary use
There are, of course, a great number of models or styles, someone style being popular in one locality, while an altogether different style is preferred in another part of the country. The most representative types are well shown in the illustrations, and a brief description will point out their practical advantages, because each model possesses certain merits – one model being designed for fast traveling in the open, another better adapted for brush travel, while others are more convenient for use in a hilly country where much climbing is done, and so on.
Style A is regarded by snowshoe experts as an extreme style, for it is long and narrow. It is designed for fast traveling over smooth and level country, and over loose, powdery snow. This style is much used by the Cree Indians, and is usually made 13 in. wide by 60 in. long, with a deeply up–curved toe. It is a good shoe for cross–country work, but is somewhat difficult to manage on broken trails, when the snow is packed, and also affords rather slippery footing when crossing ice. Owing to the stout construction of the frame and reinforcement needed to retain the high, curved toe, style A is more difficult to manage than the more conservative models, and its stiffness of frame makes it more fatiguing to wear, while its use is a decided handicap in mountainous districts, because a curved toe always makes hill climbing more difficult.
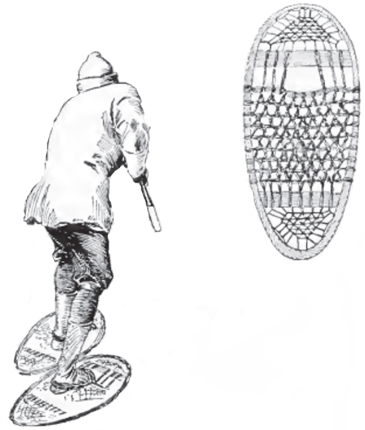
Style "C"
The style illustrated here is splendid for general purpose and is a favorite among hunters and woodsmen
Style B may be considered the ordinary eastern model, and a common style best adapted for all–around use. It is a neat and gracefully designed frame, about 12 in. wide and 42 in. long, and is usually made with a slightly upcurving toe, about 2 in. turn at the toe being correct. When made by the Indians of Maine, this model is fashioned with a rather heavy heel, which is an advantage for fast walking, while it increases the difficulty in quick turning.
Style C is a favorite model among the hunters and woodsmen of New England. This is a splendid style for general purposes in this section of the country, since the full, round toe keeps the toe up near the surface, and lets the heel cut down more than the narrow–toe models. Style C is an easy shoe to wear, and while not so fast as the long, narrow frame, its full shape is more convenient for use in the woods. It is usually made with about 1 to 1 ½ inch turn at the toe.
Style D is the familiar "bear's paw," a model originating with the northeastern trapper. This model is well adapted for short tramps in the brush, and having a flat toe, is likewise a good shoe for mountain climbing. For tramping about in thick brush, a short, full shoe enables one to take a shorter stride and turn more quickly, but it is a slow shoe for straight–ahead traveling.
Style "D"
This is the familiar "Bears Paw" model Originated by the Northeastern trapper for use on short tramps and in brush
When purchasing a pair of snow–shoes, some few important considerations should be kept in mind, and the size and model will depend upon the man to some extent, since a large, heavy man will require a larger snow–shoe than would suffice for a person of lighter weight. Height also enters into the choice, and while a small person can travel faster and with less fatigue when equipped with a proportionately small shoe, a tall man will naturally pick out a larger–sized snow–shoe for his use. For a country where deep snows prevail, larger sizes are best, but in localities where the snow packs solidly and there is considerable ice, and in mountainous districts or for rough-country traveling, the smaller sizes will give more satisfaction and prove more durable also. For a wet-snow locality, the center filling should be strung in rather coarse mesh, while for soft, powdery snow, a finer mesh will be the logical choice.
There are snowshoes and snow–shoes, and while there are fine models regularly stocked by a few of the better sporting – goods firms, there is likewise a deal of poorly made snowshoes on the market. It is well to pay a fair price and secure a dependable handmade article, for the cheaper snowshoes – often filled with seine twine and the cheapest hide (commonly known in the trade as "gut") – will warp and twist in the frame, and the shoddy filling will soon become loosened up and "bag" after a little use. The best snowshoes that the writer is acquainted with are made by the Indians, and the filling is ordinarily made of neat's hide; cowhide for the center filling, and calfskin for the toe and heel. A first–class pair of snow–shoes may be had for about $6 to $7.50, and when possible to do so, it is best to have them made to order. This plan is, of course, necessary in case one wishes to incorporate any little wrinkles of his own into their making, or desires a flatter toe, lighter heel, or a different mesh from the usual stock models.
Where but one pair of snowshoes is purchased, style B will probably prove the best selection, and should be ordered with the flat toe. or a turn not greater than 1 in. The frame may be in either one or two pieces, depending upon the size of the shoe and the ideas of the Indian maker, but it is well to specify white ash for the frames in the order. No Indian maker would be guilty of using screws or other metal fastenings, but many of the cheap and poorly fashioned snowshoes are fastened at the heel with screws, thus making this a decidedly weak point, since the wood is quite certain to split after a little rough service. In contrast to the poor workmanship of these low–priced snowshoes, the Indian–made article is fashioned from sound and properly seasoned wood; the cross bars are snugly fitted by mortising to the frame; the filling is tightly woven, and the heel is properly fastened by lacing with a rawhide thong. However, Indian makers are likely to make the toe small and leave the wood to form a rather heavy heel. Some few woodsmen and sportsmen may prefer this model, but the majority favor a fuller toe and a lighter heel for general use, because the regulation Indian model, cutting down at toe and heel equally deep, increases the difficulty of easy traveling over soft snow, although it is a good shoe when used over broken trails.
When buying snow–shoes at the store, see that the frames are stoutly and well made, and for all–around use, it is a good idea to select a filling of good heavy weight and with a firmly woven and open mesh, say, about ¾ in. The toe and heel sections will, of course, be of finer–cut hide and smaller mesh, and it is wise to avoid those shoes employing seine twine for the end filling. Some factory-made snowshoes are given a coat or two of varnish, but this, while serving to make them partly water proof, makes them rather slippery when crossing logs and ice. Most woodsmen prefer to leave both frame and filling in their natural condition.
The Indian–made snowshoe is always provided with a generously large toe hole, so that ample foot covering may be used. This point is generally over–looked in the machine–made product, and the toe cords are also frequently roughly formed, thus chafing the feet and making them sore. These details may or may not prove a handicap for short tramps near town, but for long trips through the woods, they are important considerations.
The Indian manner of tying the snowshoe to the foot by means of a single twisted and knotted thong is a good method of attachment, in that, if the thong is properly adjusted to the requisite snugness in the first place, the shoes may be quickly removed by a simple twist of the ankle. A better fastening is secured by using a fairly wide ( ¾ in.) toe strap and a long thong. The toe strap is placed over the toes, immediately over the ball of the foot, and secured against slipping by weaving the ends in and out between the meshes of the filling until it reaches the frame on either side. This grips the toe strap firmly and does away with the necessity of tying a knot. A narrow thong, about 4 ft. long, is now doubled, the center placed just above the heel of the foot, and the ends passed under the toe cord, just outside of the toe–cord stays on each side. The thong is then brought up and across the toes, one end passing over and the other under the toe strap. Each end of the thong is now looped around the crossed thong, on either side, and then carried back over the back of the heel and knotted with a common square or reef knot. Calf-skin makes a good flexible foot binding, or a suitable strip of folded cloth or canvas may be used.
The regulation snowshoe harness, consisting of a leather stirrup for the toe and an instep and heel strap, will be found more comfortable than the thong, and when once adjusted snugly to the foot, the shoes may be quickly taken off and put on again by pushing the heel strap down, when the foot may be slipped out of the toe stirrup.
The use of heavy leather shoes is of course undesirable, and the only correct footwear for snowshoeing is a pair of high–cut moccasins, cut roomy enough to allow one or more pairs of heavy woolen stockings to be worn. The heavy and long German socks, extending halfway to the knee, drawn on over the trouser legs, are by far the most comfortable for cold-weather wear. The feet, thus shod, will not only be warm in the coldest weather, but the free use of the toes is not interfered with. Leather shoes are cold and stiff, and the heavy soles and heels, chafing against the snowshoes, will soon ruin the filling.
Part 2 : How To Make And Use Them
Snowshoe making is an art, and while few, if any, white men can equal the Indian in weaving the intricate patterns which they prefer to employ forfilling the frames, it is not very difficult to fashion a good solid frame and then fill it by making use of a simple and open system of meshing. For the frames, white ash is much the best wood, but hickory and white birch are dependable substitutes, if the former cannot be obtained. Birch is perhaps the best wood to use when the sports- man wishes to cut and split up his own wood, but as suitable material for the frames may be readily purchased for a small sum, probably the majority of the readers will elect to buy the material. Any lumber dealer will be able to supply white ash, and it is a simple matter to saw out the frames from the board. The sawed–out frame is inferior to the hand–split bow, but if good, selected material can be obtained, there will be little, if any, difference for ordinary use.
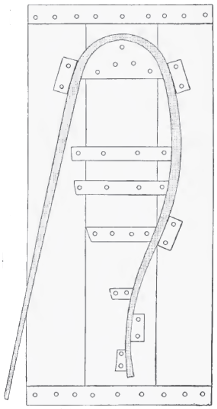
The design of the snowshoe is traced on a board and blocks are used to shape the frame or bow
When dry and well–seasoned lumber is used, the frame may be made to the proper dimensions, but when green wood is selected, the frame must be made somewhat heavier, to allow for the usual shrinkage in seasoning. For a stout snowshoe frame, the width should be about 1 1/16 in.; thickness at toe, 7/16 in., and thickness at heel, 9/16 in.
Locate the crossbars by balancing the frame, then fit the ends in a shallow mortise
The frame should be cut 2 in. longer than the finished length desired, and in working the wood, remember that the toe of the finished frame will be the center of the stick; the heel, the end of the stick, and the center of the shoe will lie halfway between the heel and toe.
After the frames have been finished, the dry wood must be steamed before it can be safely bent to the required shape, and before doing this, a wooden bending form must be made. An easy way to make this form is to first draw a pattern of the model on a sheet of paper, cut out the pencil mark, and, placing this pattern on a board, carefully trace the design on the wooden form. A number of cleats, or blocks, of wood will now be needed: the inside blocks being nailed in position, but the outside stay blocks being simply provided with nails in the holes, so they may be quickly fastened in position when the steamed frame is ready for the form.
Begin Weaving the Toe Filling at the Corner of Cross Bar and Frame, Carrying It Around in a Triangle until Complete
To make the frame soft for bending to shape, steaming must be resorted to, and perhaps the easiest way of doing this is to provide boiling water in a wash boiler, place the wood over the top, and soak well by mopping with the boiling water, shifting the stick about until the fibers have become soft and pliable. After 10 or 115 minutes of the hot-water treatment, wrap the stick with cloth and bend it back and forth to render it more and more pliable, then use the hot–water treatment, and repeat the process until the wood is sufficiently soft to bend easily without splintering. The toe being the greatest curve, must be well softened before putting on the form, otherwise the fibers are likely to splinter off at this point. When the frame is well softened, place it on the bending form while hot. slowly bend it against the wooden inside blocks, and nail on the outside blocks to hold it to the proper curve. Begin with the toe, and after fastening the outside blocks to hold this end, finish one side, then bend the other half to shape. The bent frame should be allowed to dry on the form for at least a week ; if removed before the wood has become thoroughly dry and has taken a permanent set, the frame will not retain its shape. The same bending form may be used for both frames, but if one is in a hurry to finish the shoes, two forms should be made, and considerable pains must be taken to make them exactly alike in every way.
When the frames are dry, secure the tail end of the frame by boring three holes about 4 in. from the end, and fasten with rawhide. The work of fitting the two cross bars may now be undertaken, and the balance of 'the snowshoe depends upon fitting these bars in their proper places. Before cutting the mortise, spring the two bars in the frame about 15 in. apart, and balance the shoe in the center by holding it in the hands. When the frame exactly balances, move the bars sufficiently to make the heel about 3 oz. heavier than the toe, and mark the place where the mortises are to be cut. The cross bars and mortise must be a good tight fit, and a small, sharp chisel will enable the builder to make a neat job. It is not necessary to cut the mortise very deep; ¼ in is ample to afford a firm and snug mortised joint.
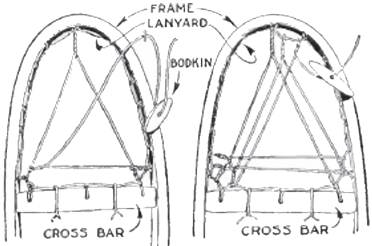
The lanyard to which the filling is woven is next put in, by boring pairs of small holes in the toe and heel sections, and lacing a narrow rawhide thong through the obliquely drilled holes. Three holes are then bored in the cross bar – one on each side about is 1½ in. from the frame, and the third in the center of the bar; the lanyard being carried through these holes in the cross bar.
Begin the toe filling first, by making an eye in one end of the thong, put the end through the lanyard loop and then through the eye, thus making a slipknot. Start to weave at the corner where the bar and frame are mortised, carry the strand up and twist it around the lanyards in the middle of the toe, then carry it down and make a like twist around the lanyard loop in the opposite corner. The thong is now looped around the next lanyard (No. 2 from the cross–bar lanyard) and fastened with the twisted loop knot illustrated. Continue the strand across the width of toe space and make a similar loop knot on No. 2 lanyard on the starting side, twist it around the strand first made and loop it under the next cross–bar lanyard loop, then carry it up and twist it around the lanyard loop in the toe of the frame, continuing in the same manner until the last lanyard of the toe is reached, when the space is finished by making the twisted loop knot until the space is entirely filled. It is a difficult matter to describe by text, but the illustrations will point out the correct way, and show the manner of making an endless thong by eye–splicing, as well as illustrating the wooden bodkin or needle used in pulling the woven strands taut. This bodkin is easily made from a small piece of wood, about ¼ in. thick, and about 2 in. long.
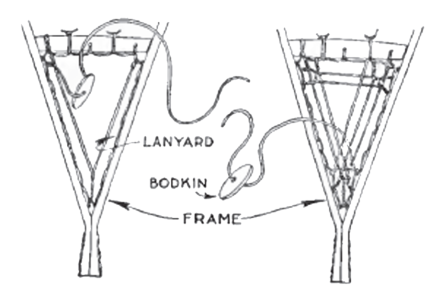
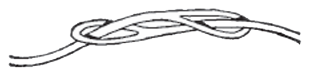
An Endless Thong is Made with Eyes Cut in the Ends of the Leather, and Each Part is Run through the Eye of the Other
To simplify matters, the heel may be filled in the same manner as the toe.
For the center, which must be woven strong and tight, a heavier strand of hide must be used. Begin with the toe cord first, and to make this amply strong, carry the strand across the frame five or six times, finishing with a half–hitch knot, as shown, then carry it up and twist it around the cross bar to form the first toe–cord stay
An endless thong is made with eye cut in the ends of the leather, and each part is run through the eye of the other The Heel Filling is Woven by Making the Connection with the Lanyard in the Same Manner as for the Toe Filling
As may be noted, the center section is filled by looping back and twisting the strands as when filling the toe. However, the filling is looped around the frame instead of a lanyard, and a clove hitch is used. A toe hole, 4 in. wide, must be provided for, and when enough of the filling has been woven in to make this opening, the thong is no longer looped around the cross bar, but woven through the toe cord. As the filling ends in the toe cord, it should be woven in and out at this point several times, finishing the toe hole by looping a strand around the cross bar at the side of the toe hole, then passing it down the toe–cord stay by twisting around it; then twisted around the toe cord along the filling to the other side of the toe hole, where it is twisted around the toe–cord stay on the opposite side, looped around the frame and ended in a clove hitch.
At the first reading, it will doubtless appear difficult, but a careful examination of the illustrations will soon show how the trick is done, and indeed it is really a very simple matter, being one of those things which are easier to do than it is to tell how to do them. The method of filling has been purposely made simple, but the majority of shoes are filled in practically the same manner, which answers quite as well as the more intricate Indian design.
The Center must be Woven Strong and Tight, and for This Reason a Heavier Strand of Hide must be Used
The knack of using the snowshoe is quickly mastered, providing the shoes are properly attached, to allow the toe ample freedom to work down through the toe hole as each foot is lifted. The shoe is, of course, not actually lifted in the air, but rather slid along the surface, half the width of one shoe covering the other when it is lifted in the act of walking. At first the novice may be inclined to think snowshoes a bit cumbersome and unwieldy, and doubt his ability to penetrate the brush. However, as the snowshoer becomes accustomed to their use, he will experience little if any difficulty in traveling where he wills. When making a trail in a more or less open country, it is a good plan to blaze it thoroughly, thus enabling one to return over the same trail, in case a fall of snow should occur in the meantime, or drifting snow fill up and obliterate the trail first made. When the trail is first broken by traveling over it once by snowshoe, the snow is packed well and forms a solid foundation, and even should a heavy fall of snow cover it, the blaze marks on tree and bush will point out the trail, which will afford faster and easier traveling than breaking a new trail each time one journeys in the same direction.

– Check Out Our –
– Other Websites –


– Check Out Our –
– Featured Articles –