Turtle Trap
Although this article is on a Turtle trap, it works equally as well used for fish.
Taken From: Turtle Trapper C E. Sprague
By: C E. Sprague © 1919
There are several different types of turtle traps in use, yet the fundamental principles are the same in all of them. I have used most of them and after fifteen years experience have concluded that the one herein described is the strongest, lightest and most practical trap one could use and very easy to build.
I knit my own traps as do many other trappers, but realizing that this would appear to most prospective trappers a tedious, tiresome undertaking, will not attempt to describe the method of knitting traps. This, as I said before, might seem a difficult undertaking yet it is simple enough after getting started.
Turtle traps could be made with mesh as large as three inches and still hold any turtle of marketable size, but in using the smaller mesh many small mud turtles and soft shells, and often fish of the dead-bait-eating variety such as mud cats and dogfish are caught and can be used for bait, where if caught in a larger mesh trap these would escape.
In order to properly build these traps a form must be built first. This form can be used for building any number of traps and may be built of any scrap lumber. Figure 1. shows form ready to set up.
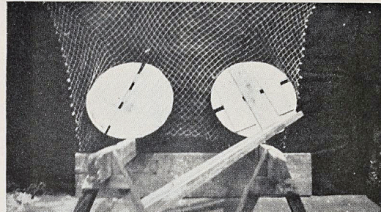
Figure 1
The form consists of two circular shapes or moulds approximately 18 ½ inches in diameter. Take pieces of lumber about twenty inches long and a sufficient u umber of pieces laid side to side to make it about twenty inches wide, nail two strips across about one-third of way from each end, figure 1. will give you the idea, then take a carpenter's compass dividers and strike a circle of the above mentioned diameter. If you haven't the dividers take a lath, cut a notch in one end, measure off 9 1/4 inches from apex of notch, drive a small nail through lath and start it into about center of where circle is to be cut, hold pencil in notch and draw circle, this will answer as well as carpenter's dividers.
Cut out form with compass saw and repeat operations for the other form. Now take eight pieces of 7/8 inch strips, 2 inches wide and 3 feet long, and nail to edges of circular form, bringing the ends of strips just even with outside surface of end forms. Figure 2 will give the idea how strips should be spaced.
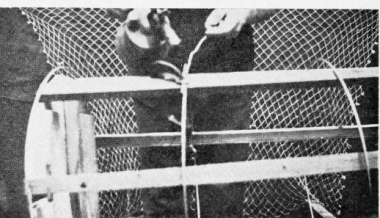
Figure 2
Now the form is ready for the hoops. There are four hoops used in each trap. These should be made of galvanized bail wire. This wire is such that is used for bails on metal pails. But if this wire cannot be secured, common No. 9 galvanized fence wire may be used by twisting two strands together. Wooden hoops are often used and if good straight grained tough wood such as elm, ash, or hickory they will do very well but of course are bulkier than the wire. Use wire hoops if possible as they are lighter and take up less space when outfit is packed which is quite important as all campers and trappers know. If wire hoops are used, bend wire around form, lap the ends about 3 inches, holding with clamp and solder. Figure 2 shows wire hoops in place and method of soldering. If wooden hoops are used they may be fastened with small nails or wrapped with string notching the wood where it laps over to prevent slipping. Do not make hoops too tight on form, but leave them loose enough to be slipped over form easily. If wooden hoops are used shave them out about 1/4 inch thick and 7/8 to 1 inch wide.
After hoops are made, place one at each end of form and the other two a foot from each end. Now take a 5 foot piece of the net and lay over the form and hoops, with knotted ends over the ends of form, tying the ends of net together lengthwise of form, mesh to mesh until entire length is tied.
Figure 3 shows about the desired proportions to project over the ends of form.
After net is tied together lengthwise, run a draw string through the end appearing at left of illustration No. 3, put string in one mesh and out the next, continuing clear around the entire end, leave string long enough that net may be opened the full size of form and tie ends of draw string together.
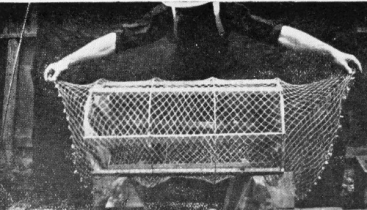
Figure 3
This is the rear end of trap giving access to bait hook, and for removing the catch.
Now draw net straight on form toward the opposite or forward end until it hangs even all around and half-hitch net on the hoops as shown in figure 5.
Pass twine through net, where it crosses hoop, under hoop, back through net and run twine through loop thus formed making a half-hitch. Make a half-hitch every inch or so all around each hoop. This will hold hoops in place.
Now we come to the mouth, or business end of trap. Run a draw-string through the mouth end of net the same as you did the rear end, draw this up until there is an opening about fourteen inches across when the edges are together, leave this string a little longer for adjustment if found necessary. Figure 6 will give the idea.
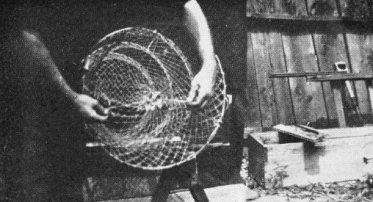
Figure 4
Now take two pieces of twine each about 5 feet long and double each piece, slip loop at opposite points through net and draw string. Figure 6 also shows how these should be placed. These are stay strings to hold the mouth of trap in place. Trap may now be removed from form.
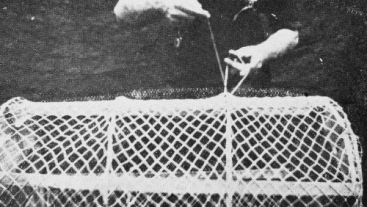
Figure 5
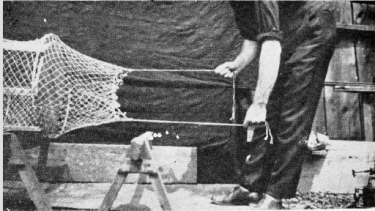
Figure 6
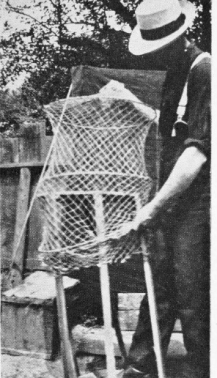
Figure 7
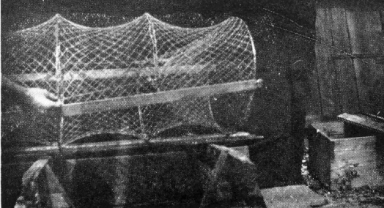
Figure 8
The next step will be to place the side sticks on outside of trap. Take two pieces of lath or any small sticks, I use green saplings as they are tougher and heavier, these should be slightly longer than the trap between the end hoops, cut notches near ends as shown in figure 8 and tie to end hoops at points even with stay strings.
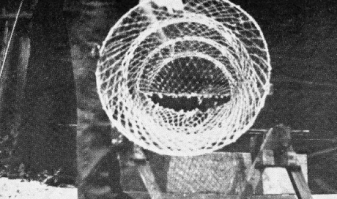
Figure 9
The mouth end may now be turned inside of trap, passing the ends of stay strings out through the opposite sides of trap just ahead of third hoop from mouth end and tie to the rear hoop of trap, drawing taut. Figure 9 shows the size the opening should be at mouth of trap; this may be arranged by adjusting draw string. Now take a piece of twine and tie to top of third hoop from mouth end and let hang down and tie to bottom of same hoop, fastening a wire hook on this string directly in line with mouth of trap for bait hook. Some trappers use a tin can with half inch holes punched here and there to put their bait in, instead of a hook. This is a very good idea as the first turtle entering the trap cannot tear bait loose causing it to fall to bottom of trap thereby ending the catch until fresh bait is again placed on the hook. Now the trap is complete and ready to use as shown in figure 10.
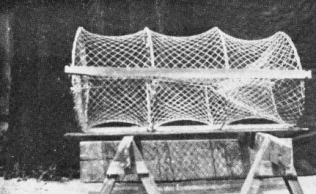
Figure 10

Figure 11
The trap must be drawn taut on these side sticks otherwise it will lop this way and that, but if drawn taut will be rigid and firm.
Figure 11 shows trap in knockdown, note the small amount of space taken up where wire hoops are used. A set of fifteen of these traps takes up very little room and may be packed in an ordinary sack.

– Check Out Our –
– Other Websites –


– Check Out Our –
– Featured Articles –